A little table for the window
Elizabeth wanted a table for the kids that is the right height for them to sit at. To try and fit all three while fitting the table into the house somewhere though is an issue. The best spot to put it wasn't very flexible with the fireplace as one boundary and the wall as the other. Nothing that can't be solved by making your furniture exactly as it needs to be.
Now I don't want this to be a horrible thing that I dislike having in the house but I also didn't want to make it a giant project. The kids will only be the right size for so long, this is a temporary thing that we are only talking about using for a few years. Using the countertop from Ikea for that coffee table went real well last time and I like it a lot so I decided right from the beginning that would be the table surface. Put it on the shopping list and get one the next time others go to Ikea.
In the spirit of a non-permanent piece of furniture I went with the cheapest solid wood option at ~$130. The birch that is only 1-1/8" thick. (I don't like oak or beech as much).
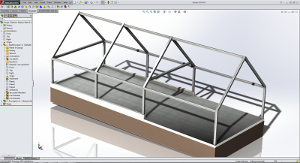
A little talk about what height the table should be then measurement of the available space and bam, a quick sketch of what I was intending to do with the important dimensions. Exact details can be figured out on the fly.

A quick trip to the steel yard for some material ($30 for probably 3x what I needed) and then chop it up into the bits that I need.

I should probably show how to get everything square and on size when welding something like this up but frankly it sticks together so fast that I would just really be slowing things down. Especially since holding everything in place takes all the hands and knees I have sometimes.

Anyway, a simple frame with 1"x1"x1/8" angle on the top and 1-1/2"x1-1/2" 14gauge square tube on the legs. If you notice the angle is positioned so it sticks up and a table top siting on it would just sit on the turned up 1"8 thick edge. That comes into play later.
I need to do some work to the wooden top first though

Trim that puppy down to size. As I always do for cuts that matter I clamped a guide fence onto the counter-top to make my cut dead straight. Another tip, when the board you are cutting is thinner that what you can cut with the saw reduce the the blade stick-out to only protrude a little from the bottom of the board. That minimizes splintering.
After I trimmed the board I threw the metal frame on and marked exactly where it would support the tabletop.

This is where the fact that I turned the angle up on edge comes into play. The counter-top is not strong enough to hold itself flat by itself for that long of a span so I needed to have a structural member running along the length of the table to tie the legs in and help support the top. In order to maximize the time the table is useful though I wanted to make the top as thin as possible. That way kids legs don't bump up into things when they start getting a little too big for the table.
To do that I decided to use angle and put the leg sticking up into the table top itself. With the 1"x1"x1/8" angle I got that means a 1/8" wide by 3/4" deep groove is necessary. I will often use a router for pockets and stuff like this but 1/8" wide and 3/4" deep is absurd so using my circular saw was the answer.
I set up with a standard framing blade set to 3/4" depth.

Then setup my "fence" and started cutting along the previously marked lines

Some saw blades have a 1/8" kerf so I could have done it in one shot but I don't have one that wide. For almost everything I really like the thin kerf blades and stock those. As a result the only ones I had on hand that were sharp enough to use were thin. So the easy way to solve that issue is do two passes with a shim to space me out and make the slot full width.

I just bent it up from some steel strap I had lying around, nothing special.
Now what happens where the grooves make a corner? The angle iron requires full slot depth all the way to the corner but the sawblade is only full depth a few inches back from the edge of the cut. Well, when I welded the frame up I made sure to leave enough room from the legs to the edge of the tabletop so I could overrun on my slot length and bring the full depth right up to the intersection.

Did I get everything right though during all the measuring and grooving?

Yep, the frame fits right into the grooves and sits there perfectly. It only took a tiny little bit of tapping.

Now to hold the base and top together I am going to throw in a few screws, one roughly every foot.

Measure them out, prick the spot with a punch and then drill through the steel and into the tabletop

That match drill was the proper size for the hole I needed in the table top (to make driving screws easier and prevent any splitting) but it is too small for the metal side of things. I already have my initial holes in the right place though so shooting another drill through to widen them out to a clearance hole for my screw is easy.

The screw I had on hand that fit the job were flat heads so a quick hit with the countersink on all the angle iron holes will let them sit flush with the surface

Tie to paint now. A couple of wipe downs with acetone to make sure everything is perfectly clean and then some rattle can application of a gloss red. Now if this was something that needed a perfect paint job with all the blemishes sanded out or something like that I would go with fast drying primer and alternate between wet sanding and spraying another layer until I reached the level of finish required but when it isn't critical I really like just spraying Rustoleum straight on metal. It doesn't seem right but I have had better adhesion and a more durable surface that way. Thoroughly clean with acetone and then immediately spray with Rustoleum.

The day was fading fast at this point and I was running out of daylight. Even though the paint was still a little tacky I maneuvered the frame into place on the table (without touching and visible surfaces or letting it mark the wood) and screwed it onto the counter.

I let the paint cure some more while we did the kid nighttime routine and then applied some felt to the bottom of the legs. This stick on felt isn't good for chairs or a table that gets moved around (it gets knocked off) but this table will be practically fixed with the fireplace holding it against the wall and I don't think more intensive methods are necessary.

With the kids in bed the unfinished paint won't be disturbed all night so I brought it in to cure faster in the warm house instead of outside.

There you have it, another table that fits our needs exactly. I accomplished what I wanted on this project. It is something that won't bug me for the few years we have it but isn't overdone. Only a day of my time and ~$160 materials. I wish all my projects were that quick and inexpensive.
