


Westwood Shop
2017-2018
So I bought a house without a garage or shop because it was a good deal and within the budget. It had a large enough yard to add a shop and that was the intention at first but oil was going strong and we were paying of the house quick so I decided to go for paying it all off instead of saving for the shop. Well, life happens and situations change so I am back to staying in this house awhile and really need a shop to work in.
At the beginning of 2017 I told myself that it had been long enough and I was going to make it happen this year! I started planning things out and considering what I wanted. I had enough space for a structure 20ft wide and 65ft long on the side of the house but there were some limitations imposed by living in the city (I HATE the city and asinine regulations). In particular the zoning rules created two real design limits: one on size and one on height.
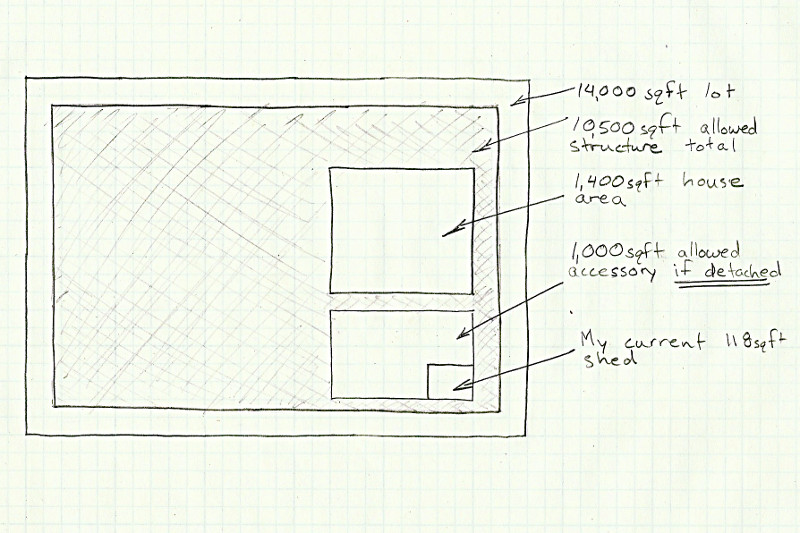
While in some ways understandable the size limit set forth by city of Bryan code is rather irksome. The primary structure (or total of primary and accessory structures) can cover up to 75% of the lot (in my case this would be 10,500sqft) but if detached the total square footage of accessory structures must be less than 1,000sqft. I already have a nice little shed which takes 118sqft so if I build a tasteful detached garage I am only allowed 880sqft. If I'm willing to attach it to the house though I can add 9,000sqft of monstrosity! Because that makes sense!
Here it is graphically. If I attach my shop to the house I can build something the size of the shaded area. If I build it detached I am only allowed the rectangle in the corner and the shed has to come out of that square footage.
Anyway, tying into the house would require some seriously major work and is something I am just not willing to do for the sake of dancing around regulations to gain a few hundred more square feet. Luckily there is a loop hole which allows some extra usable square footage for my purposes. Carports are explicitly exempted with no stated size limits so instead of building a shop with space for working on stuff and storing cars I can build a shop and include a carport to store the cars under.
Now the second major design constraint imposed by the city is the height of this shop. Like the size limit, things are different if I make it attached or detached. If detached the average roof height must be less than that of the existing primary structure (roughly 13ft) but if attached to the house then I could build pretty tall, 35feet tall actually. These aren't peak heights but average roof heights, depiction below:

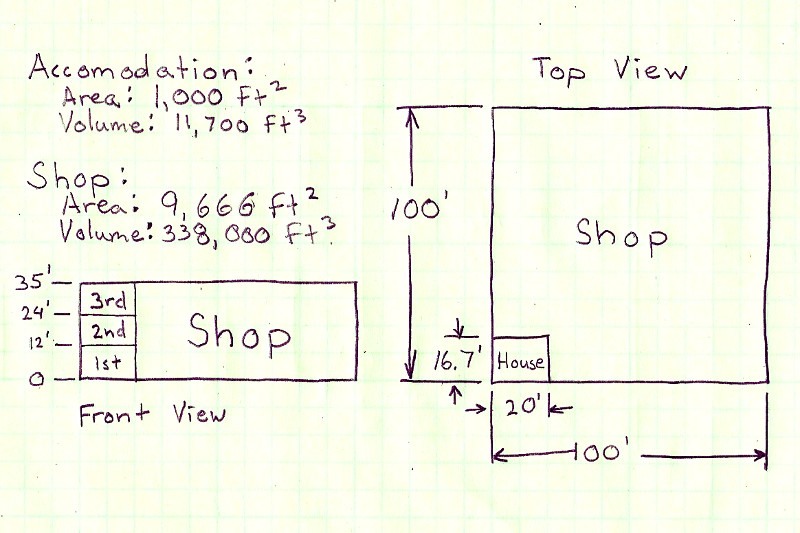
For the sake of being absurd and demonstrating the stupidity of these codes lets play a game of what could I build? The minimum heated and cooled living square footage I am zoned for is 1,000sqft. To be simple say I design a 100ft x 100ft square building with a flat roof and walls 35ft tall. I can certainly fit 3 stories into 35ft so 1,000sqft of accommodation split into 3 floors is only 333sqft required per floor. So three floors about 12ft tall which have a footprint of 16.7ft x 20ft. The resulting garage space left over would have over 9x the area and almost 29x the enclosed volume of the living space!
And all the city could say about it is: "Your plan complies with city code, here is your permit." Whoever came up with this stuff should hope that I never become rich enough to build a technically compliant show house right next to them just for spite because I just might do it. The more rules you make the less people who actually do stuff are willing to play ball. I will eventually move out of town and if I ever start a business it will never reside inside city limits where they can collect tax revenue from my work in exchange for making life difficult.
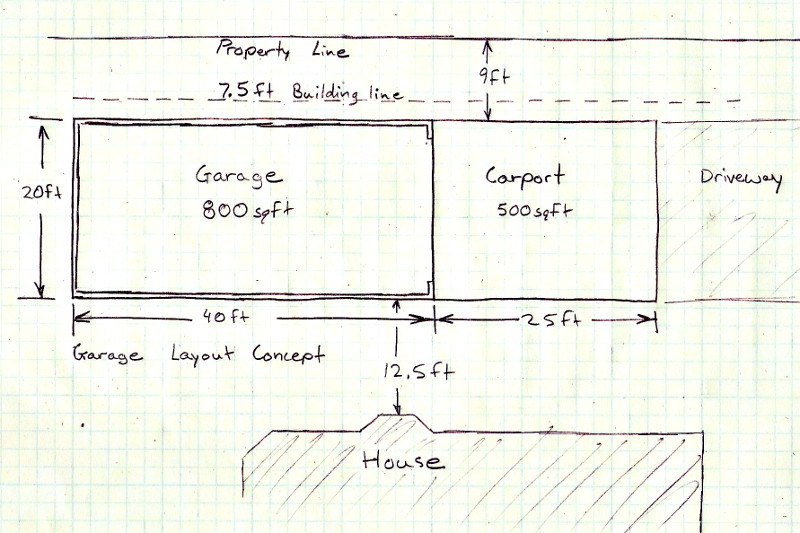
Moving out of the city isn't going to happen for awhile though and I'm never going to be filthy rich so lets get back to reality and what I'm building now. As I mentioned earlier, the space I have to put a shop lends itself well to a structure that is about 20ft wide and roughly 60 to 70 feet long. To comply with accessory square footage I can enclose up to 40ft of the building and make an 800sqft of shop. The remaining area in the front can be a carport.
This is where I bump into the height limit. My house has a 10:12 pitch roof sitting on 8ft walls resulting in an average roof height of roughly 13ft. Now most garages have 8ft ceilings and a 7ft door opening but if you have large vehicles or want to use it as a workspace that is far from ideal. You can't swing a piece of plywood around without being real careful not to hit the ceiling, you can't bring anything remotely tall inside while sitting on a trailer and you can't drive many of the vehicles I may own in the future inside to work on them.
So I would really like to have 10ft ceilings and if possible a 9ft tall front door. Is that possible with the 10/12 pitch roof that matches the house? At 20ft wide the average roof height is width*pitch/4 = 20ft*(10/12)/4 = 4.17ft. Well, 10ft+4.17ft is more than the 13ft I'm allowed so nope, against city code. Ok, I guess if I want to keep the 10/12 pitch then 8ft walls are really required.
I haven't mentioned it but besides the 10ft ceiling I would really like a loft in at least part of the shop so I can store stuff. It would really be good for this to have at least a central aisle that is tall enough for me to walk in. Call it 2ft wide and 6.5ft tall. This might be possible right? A height of 6.5ft with a rise of 10/12 only takes 7.8ft of linear run so I could have a 4.4ft wide aisle in the middle! Not so fast, I am going to need to fit an actual floor structure in there and the joists have to span 20ft. This will take up about 1ft for the bare minimum solution and if I really want to store stuff up there it is going to be more like 1.5 so I don't have problems with it sagging over time. Well, 6.5ft + 1.5ft means I need 8ft of roof height which takes 9.6ft of length. Not ideal to have a 1ft wide walking aisle that I don't have to bend over for but I guess it could work.
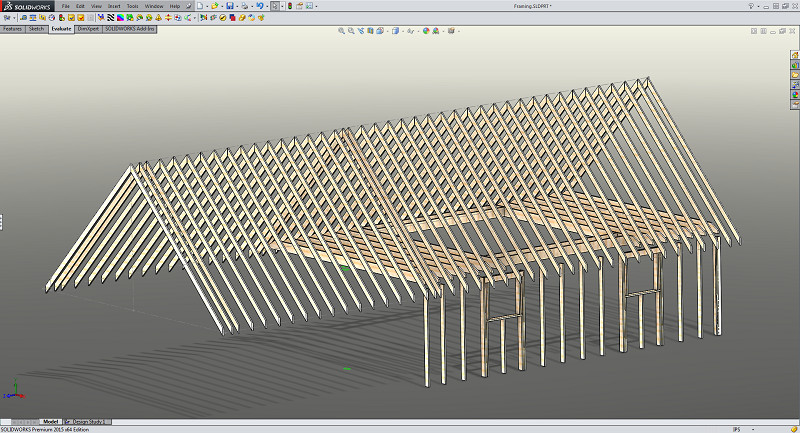
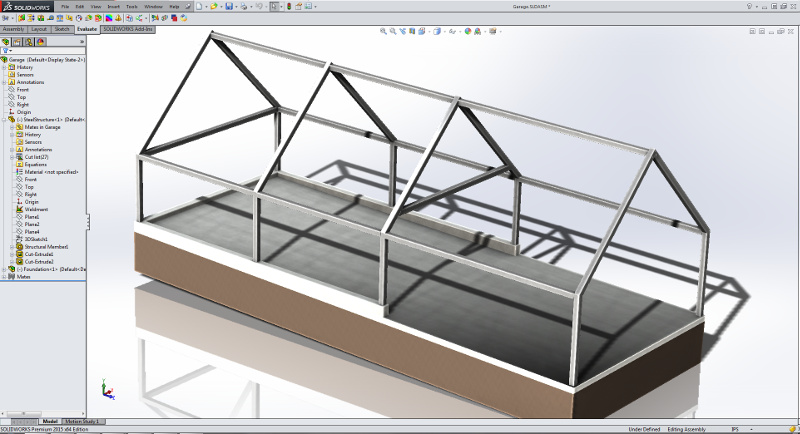
So I started down the path of making a stick framed shop, not exactly what I wanted since I couldn't have walls taller than 8ft but if I wanted to match the 10:12 pitch of the house I knew that going with wood was probably the cheapest and easiest solution. I started designing a standard structure according to IRC 2009 (current code with some amendments for the city of Bryan). Even though Solidworks isn't a good program for this I started making models of the framing etc.
Then I started getting into some of the difficulties of conventional stick framed construction for the structure that I wanted to build. Things like having 40ft of wall without bracing against wind loads, having a practically empty wall that doesn't provide any bracing on the end with the large door, wanting to span 20 ft from the edge of the building out to the carport columns. These are all doable things but are really outside the scope of the simple construction guidelines in the residential codes and started bumping me into a lot of full blown calculations and some technically difficult situations that dictated limitations I didn't really like. So I dropped the idea of stick built construction and decided to bump up to a steel frame.
Building a steel structure is much more flexible in terms of design so I knew I could get exactly what I wanted if I went that route. It is a much more intensive design process though. Pretty much as long as you stick to the allowed spans and design features with the lumber stated in the residential code you can just draw up the plans and build. A custom steel building like I wanted though requires calculation of wind loads from all directions as well as snow/rain and then actually designing the foundation, structure, welds etc. I'm not a civil or structural engineer so I couldn't do this work for someone else but a residential building for yourself is exempt from the requirement for PE stamped drawings and I can do the calculations. It just takes time and looking up all of the relevant information in the various codes (IBC 2009, ASCE 7-05, AISC 13th ed). Did I say a lot of time when your not familiar with all of it? It does take time but I kept grinding through on it and designed most of the major elements of the structure and started modeling it in Solidworks.
Now during all of this design work I was also looking at the cost of the building and trying to figure out where I could optimize my design to save money on materials as well as figure out a budget that I could plan around. Unsurprisingly the foundation is an expensive part but there isn't much to do about that, you only get one crack at it and there aren't many options for making it less expensive. I could put off some of the parts of the building until later, things like interior insulation and finishing, a loft, my complete electrical wiring, my air line system, an automated door etc.
You can only go so far though and my estimate in the $45-$55k range was definitely squarely in the "I need to talk to the bank" category and not something I could just fund as I went.
Since that was the case I thought I would probably need a pretty good design worked up with drawings and everything before I really got started. I would need them anyway to submit to the city for building. This had all been taking a long time to do though and after I spent some time offshore I started thinking seriously about how long the process was taking and how long it would take me to actually build the thing myself.
I was really getting tired of not having a shop after so many years and decided it just wasn't going to happen fast enough if I went through with doing it myself. What do I want to do? Should I work on a shop for the next few years or should I just pay to have it built and start using it?
I started asking around at different places to see who built the kind of thing I wanted in town. I didn't ask any residential stick built contractors as I already knew from my preliminary design that what I really wanted wasn't practical in wood. My first series of people to ask was actually those who do pole barns since that is the least expensive form of construction and I don't intend to stay at this place the rest of my life. None of them did any work inside the city though because of the difficulty of permits and such.
The next place to turn was then the plethora of metal building providers since they do steel. The answer from all of them though was that they didn't do steep roofs (10:12) like I wanted. They said if I wanted one then I would need a contractor that did welded on site construction instead of bolted up pre-fab construction. Those are not that common though and none of the ones around here that will do small residential construction are willing to work inside the city limits, again too much of a pain with drawings, permits and inspections.
At this point I started reconsidering the have someone else build it path. I really wanted to build something that matched the pitch of the house and had the features I wanted. Based on the conversations I had now had with people though I had realized that doing my own welded steel construction inside the city was likely to be hassle and that coupled with the long timeline meant it probably wasn't a realistic option.
So, I'm kind of sitting back at zero again. I started talking some more with local turnkey metal building contractors and found one that would do a 6:12 pitch (most stopped at 4:12). I went back and forth with them working out what the different features I wanted would cost and what they were willing to do. I compromised on my 10:12 roof and hardie panel siding but selected some better looking panel types and bumped the walls up to 10ft instead of 8ft (12.5ft average roof height with the 6:12 pitch roof). With a decent number in hand I went to the bank and got a cash out refinance to pull some equity back out of the house (we had paid alot extra in before deciding to stay and build a shop).
Cash in hand I signed a contract for a 20ftx40ft building with a 20ftx24ft carport and a two car driveway. I'll get windows, doors and insulation but no electrical work or a garage door.
On the garage door it just didn't make sense to pay for it. It was going to cost $4k but would be the wrong color and wouldn't have a feature that I really wanted. Namely, a louvre vent system in the bottom section that I could open or close so that the shop would self ventilate like my little shed. There wouldn't have been any easy way to modify it either since the sections in the door I would have gone with are foam filled steel skins. I estimate materials to build what I want will be roughly $2k and with a building to protect me I could finish it in less than a week (if I take off).
Enough talk, lets get to the actual build shall we?
Foundation
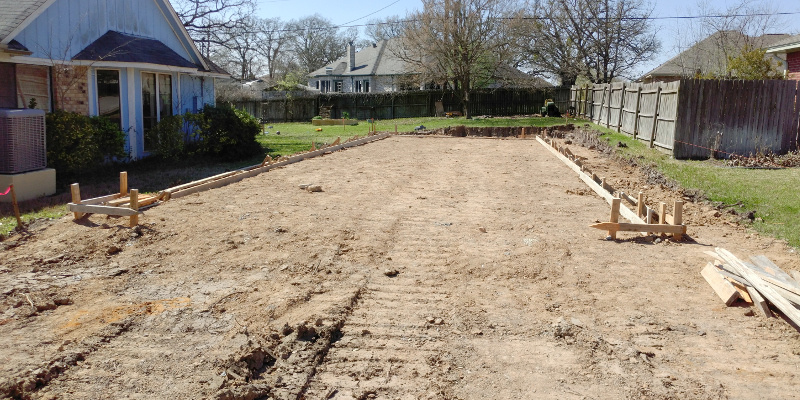
So at the beginning of March work finally started on my shop. Not exactly on track to finish in the now long gone year of 2017 but hey, it is getting done finally! Unfortunately the time to start coincided with a need for my presence in Mexico for work.
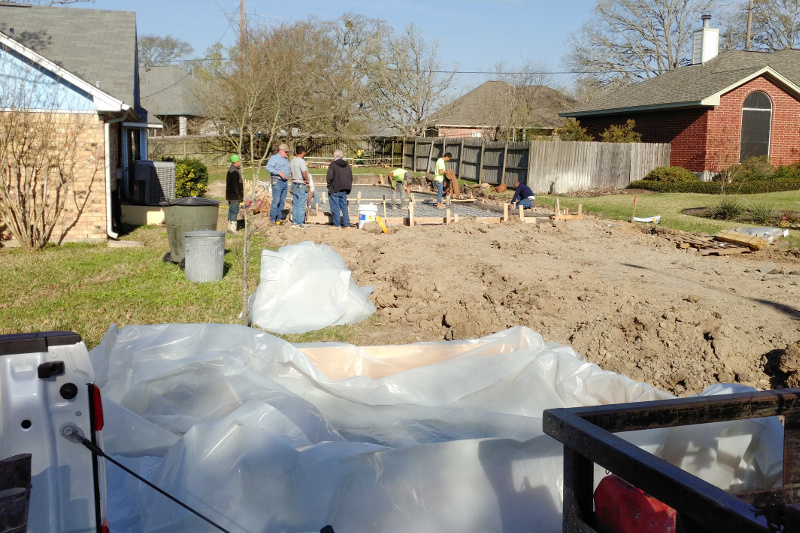
I was able to avoid going out on the entire cruise but dirt work still started in my absence while I help mobilize a local vessel for our job. The excavator took out two trees that unfortunately had to go and also dug out the area that the building was going to go.
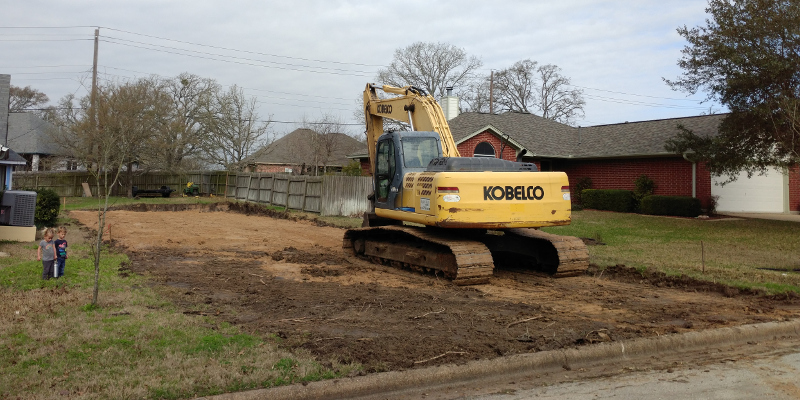
More than just leveling the site it dug up the whole pad area an extra 2ft deep so that it could be back filled with select fill that won't expand and contract like the natural clay I have in my yard. That is the reason for the brown/red soil toward the back.
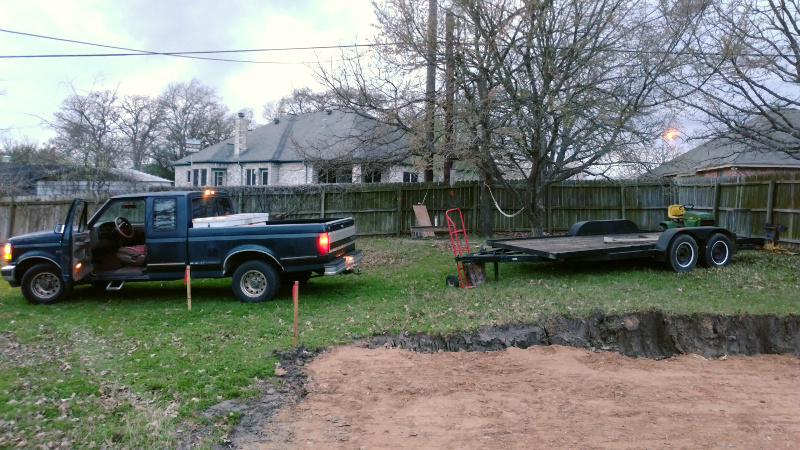
Now since I was gone when the site prep started I came home to an unfortunate development. My trailer was now trapped behind a new 2ft drop off and I couldn't hitch up a truck to move it.
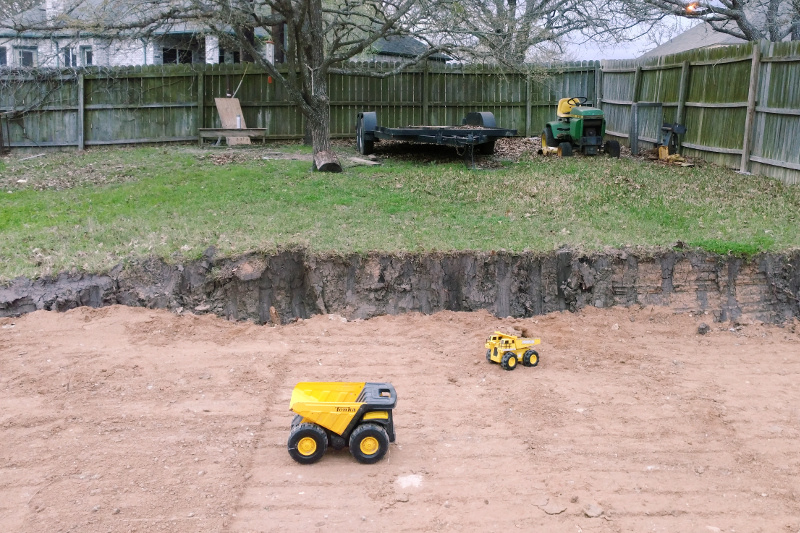
Now eventually that drop will be turned into a slope but by then the building will be in the way so as inconvenient is it was the best time to move that trailer was immediately. This trailer pulls pretty well with a weight distribution hitch likely because it is balanced pretty far toward the tongue. I picked it up with an improvised trailer dolly and worked it around eventually to a point where I could hook up and tow it away. Then I took the trailer to work so I could park it out of the way for a few weeks during construction.
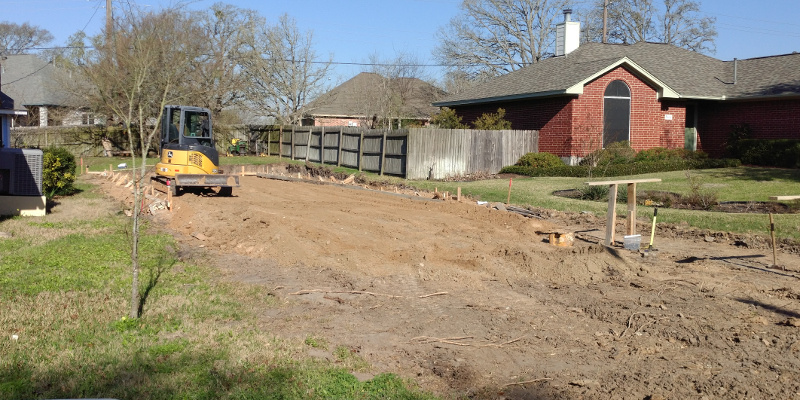
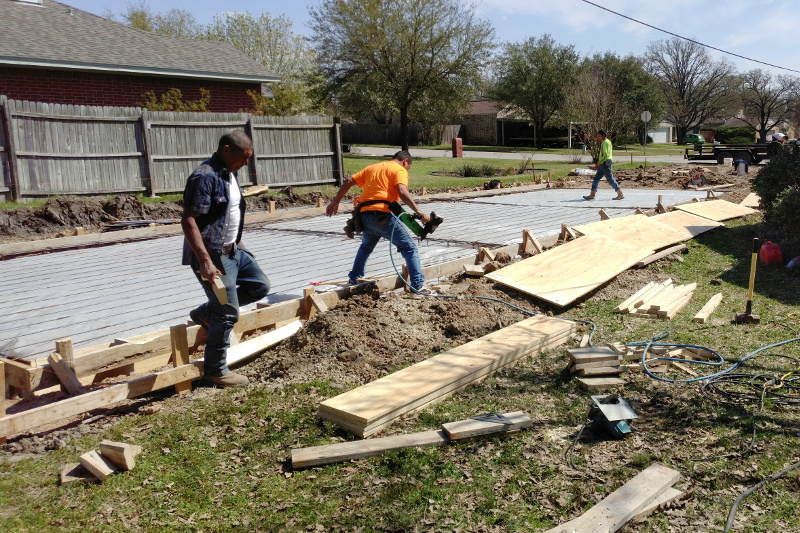
The concrete guys weren't available immediately but eventually they showed up and started their work. They measured out and started putting up forms for the building foundation.
The next day they brought out a mini excavator and started digging footings. Their will be a perimeter beam and two interior beams that are 14in wide and 36in deep.
Now I measured the forms the day before and was a little confused but didn't say anything because I didn't have a set of foundation plans in my hand and wasn't entirely sure that they were going to do what I thought but when they started digging the grade beams I knew that there was a problem, the foundation width was off!
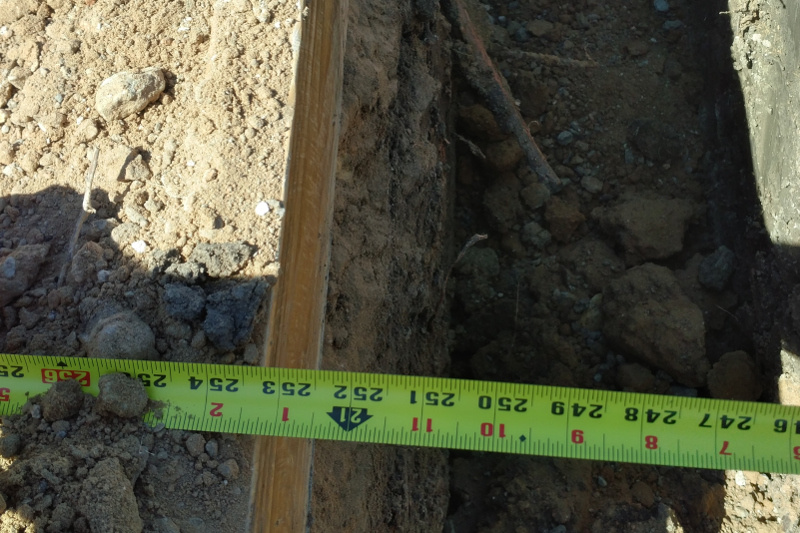
The overall width of the foundation was going to be 20ft 11in for my nominal 20ft building. I knew that the foundation was likely going to be a little larger than 20ft but an extra 11 inches just didn't seem right. Well I got a hold of the job foreman who obviously did have a set of drawings in the truck and we figured out the issue real quick. The drawing was wrong, it was drawn as if I was going to include a brick ledge around the building instead of metal panels running from ground to roof. This required an extra 4 inches on all sides and made overall width 20ft 11in instead of 20ft 3in.
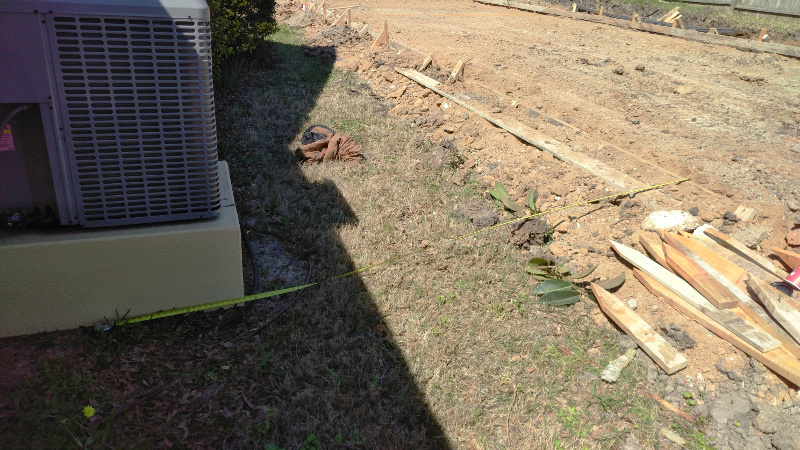
Now I did think about doing a brick ledge but decided it wasn't worth the money and it also wasn't worth the width. The picture above shows the problem, with the building set 9ft from the property line (±6inches) that extra 8 inches of building width would mean that there was only 9ft 1in between the shop and my home AC condenser unit. Well, my trailer is the full allowable non-permit 8ft 6in wide so if I tried to park it between the garage and house I would only have 7 inches total clearance. I don't know about you but that falls under the realm of tedious for backing up a trailer instead of just cautious like having 7 inches on each side.
Anyway, they dug the trench an extra 8 inches wider on the house side of the slab and planned to add some plywood on the outside to form the 8 inch gap out later.
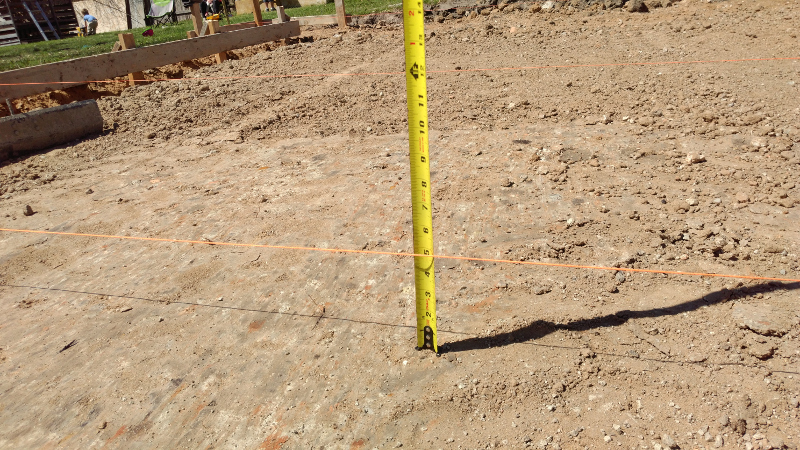
To check the slab thickness the workers strung a line tight across the forms so they could measure it out. Pretty mush spot on 5 inches like it should be.
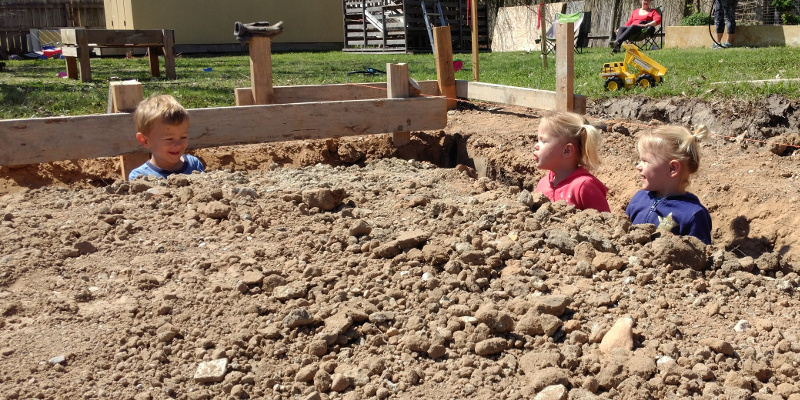
When they knocked off for lunch we checked out the trench. Just some little heads peaking up out of the ground as the run around.

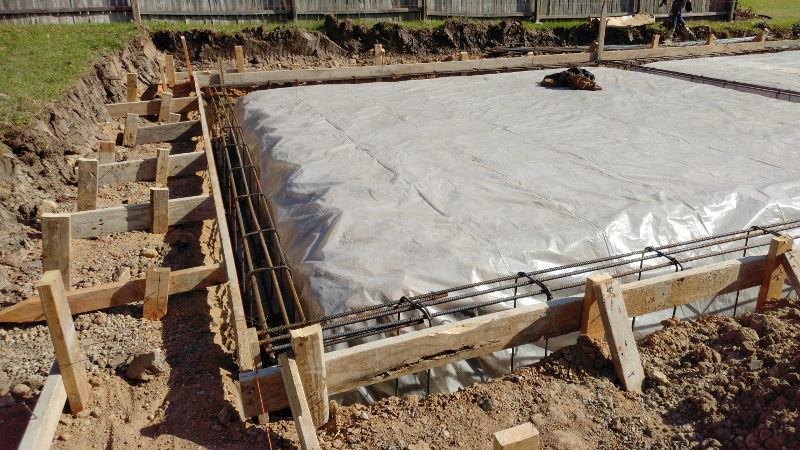
After all the digging and leveling was done they rolled out the vapor barrier. Just some thick plastic sheeting. Doesn't look like much but it definitely helps to keep water out of the building and slow down the swing in subgrade moisture content.
After the vapor barrier the steel starts going in. For the beams #3 (3/8") stirrups every 24inches with 3 #5 (5/8") bars on the top and bottom. It is easiest to wire it up in sections and then tie the larger sections together after lowering them into the trench.
While the foundation guys were putting the steel in the grade beams I started getting my plumbing and electrical rough in ready. I glued up my sink drain pipe section and three conduit sections. I'm not going to put any of this in immediately, plumbing and electrical will come when I have money to do it but you only get one chance to prepare for the future so I needed to do it now.

You might wonder why 2 of the 2-1/2" conduits as well as a 1-1/2" conduit. Well, I went with 2-1/2" because it is always easier to pull through a bigger pipe and I wanted to make sure it was big enough to handle more than I think the power company will ever let me have. I put in two so that if I manage to get 3 phase I can run it straight in to the shop and then run to a subpanel on the house. The little conduit is for low voltage stuff like Ethernet or an intercom system.
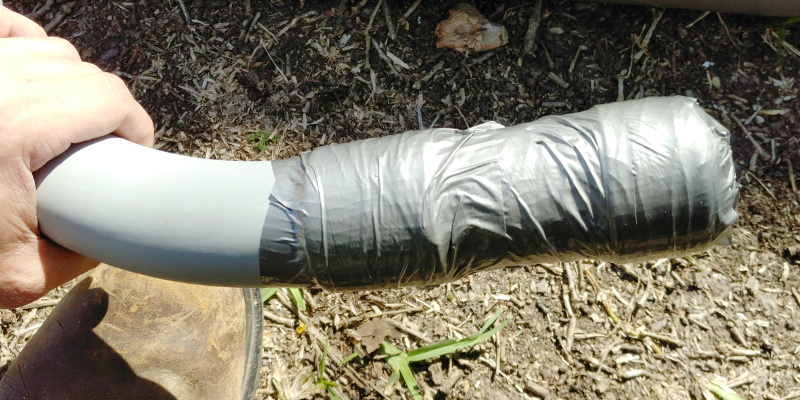
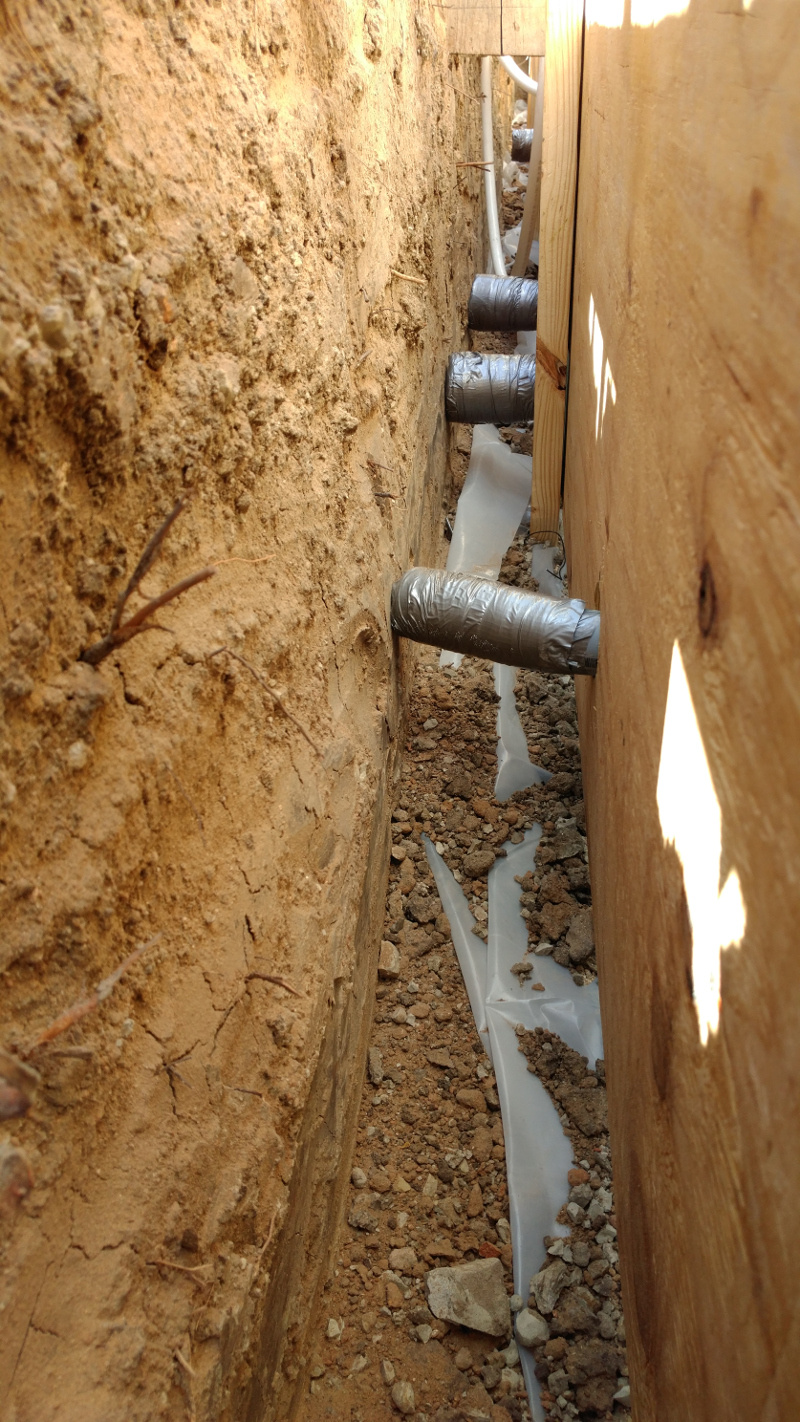
To make absolutely sure that the ends wouldn't be encased with concrete I wrapped them up with some adhesive backed foam I had lying around.
To make sure the concrete didn't get into the foam I gave it a wrap of duct tape afterwards.
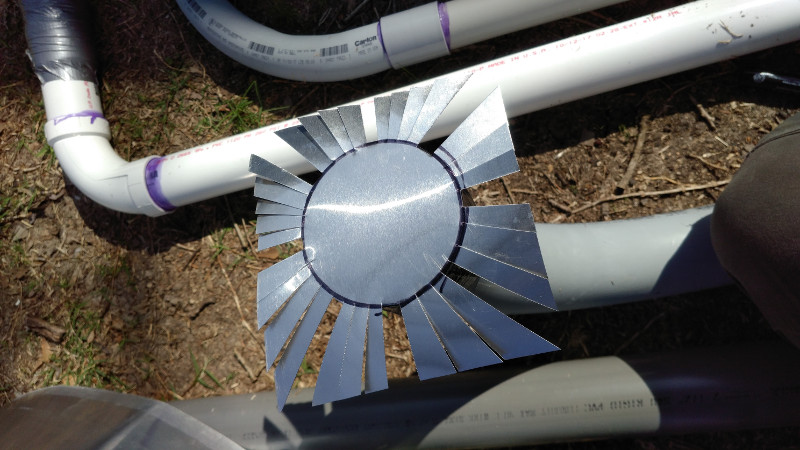
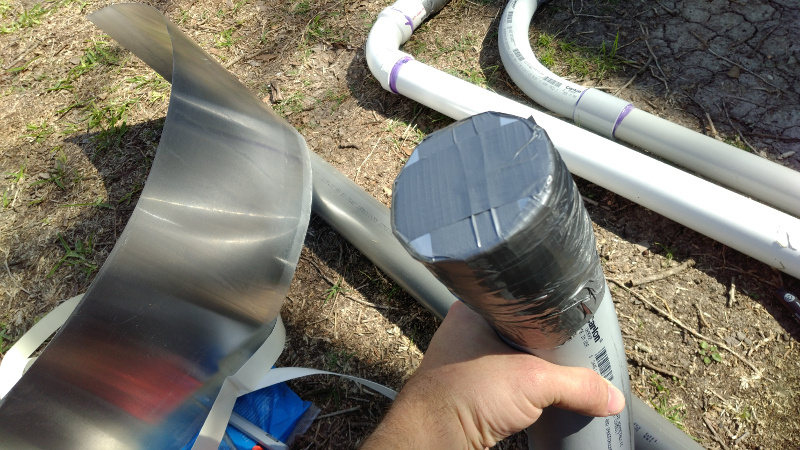
Unfortunately the hardware store didn't have caps for the 2-1/2" conduit so I had to make some coverings to keep the concrete out. The quickest route forward seemed to be just taking some aluminum flashing and whipping something up with it.
Then I covered it all with some more duct tape.
Now I already mentioned that the trench on the house side of the slab was too wide. To make it work the foreman went out and bought some plywood sheets. Then the concrete guys formed the the slab 8 inches slimmer with the plywood.
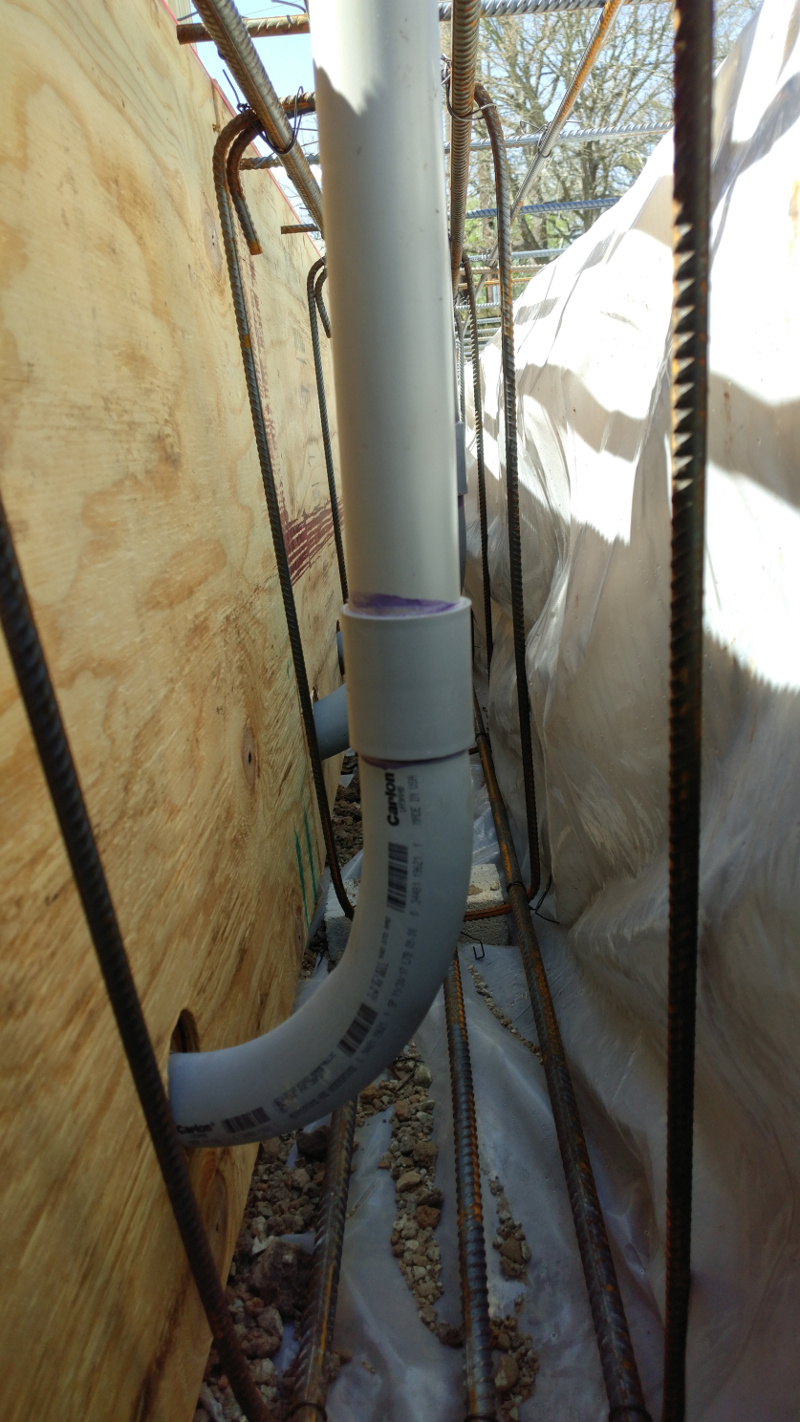
And here it is installed and blocked up to keep it in place during the pour. You can see that while they were doing this I put in my plumbing.
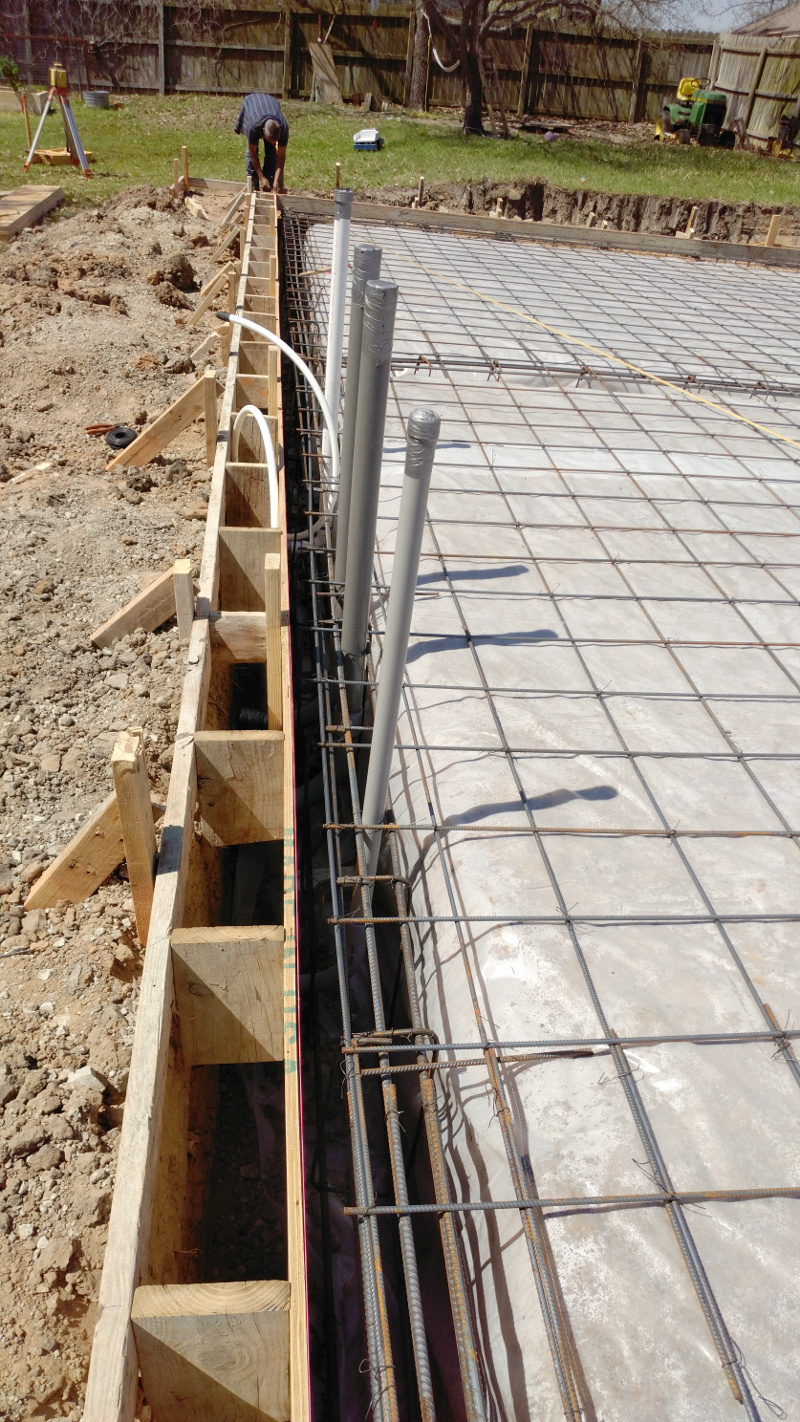
Since there was plywood at the edge of the trench instead of a dirt wall I could dig out I used a hole saw to make some openings that I could stick the pipes through so they would stick out past the edge of the foundation.
In addition to the pipes I also needed on more important thing that is a recent code development. That is a bonding point for using the rebar as a ground connection. This is known as an Ufer ground in the trade. At least 20ft of 1/2" rebar in a concrete footing that is in direct contact with the ground. Now in this instance I put in a full 20ft bar and tied it to the reinforcing so the length is more than adequate. Most of the slab though has a vapor barrier which means it is not in direct earth contact and doesn't count. I'm not sure if the resulting connection can be considered a ground or not as my reading of the NEC code doesn't seem clear but it can't hurt at any rate.

So everything for my eventual utilities is in place, wired up and ready for the pour.
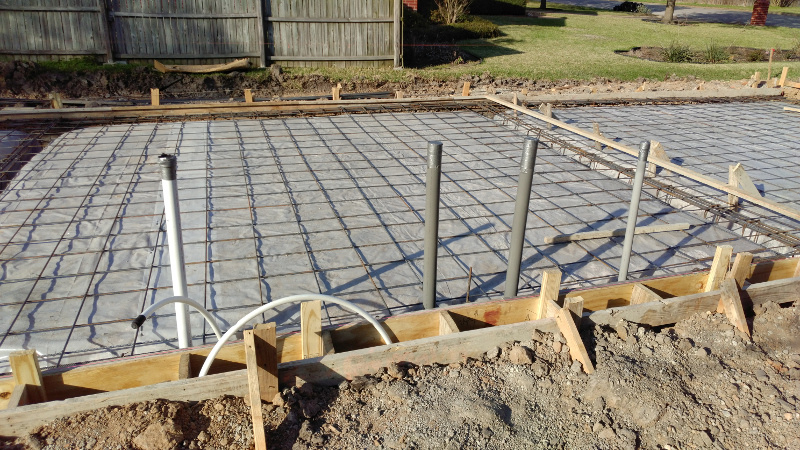
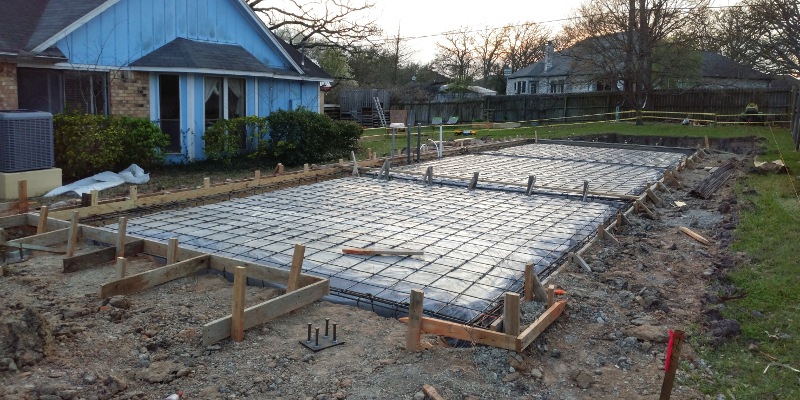
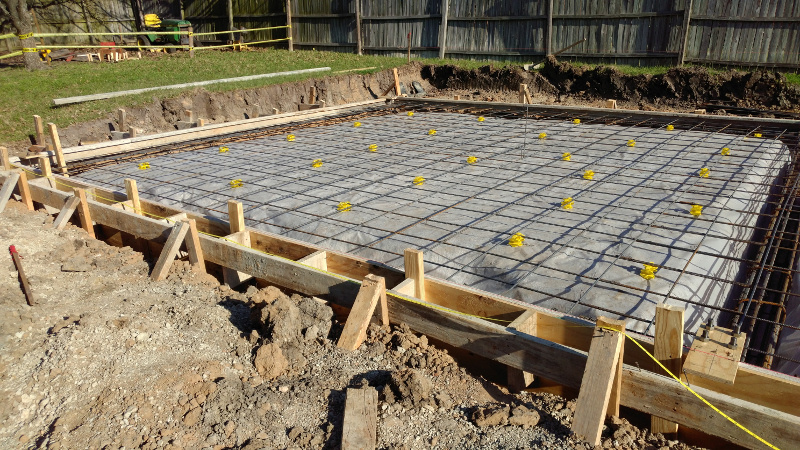
After the steel for the grade beams was in they set out the rebar for the slab. A grid of #3 (3/8") rebar on 12" centers in each direction. At this point everything is formed and ready for a pour next day. You might notice in the background that I added a caution tape fence to keep kids out. Elizabeth organized a concrete pour party for the next day and we needed a way to keep the kids out of the way while the work was going on.
I said everything was ready. It was almost ready. That evening, before I put up the caution tape, the prime contractor started putting in the bolt templates.
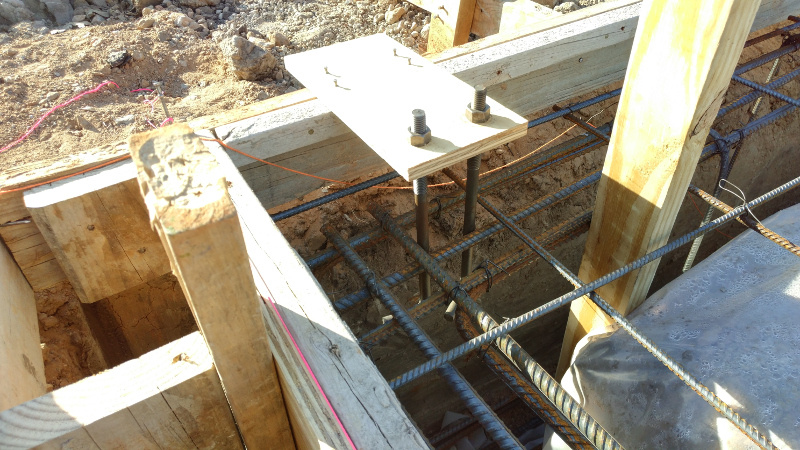
Well, while he was putting in the templates he came across a small problem. The form for the transition from the building to carport was a few inches off of hte right place. So, before the concrete arrived in the morning the concrete contractors fixed the forms.
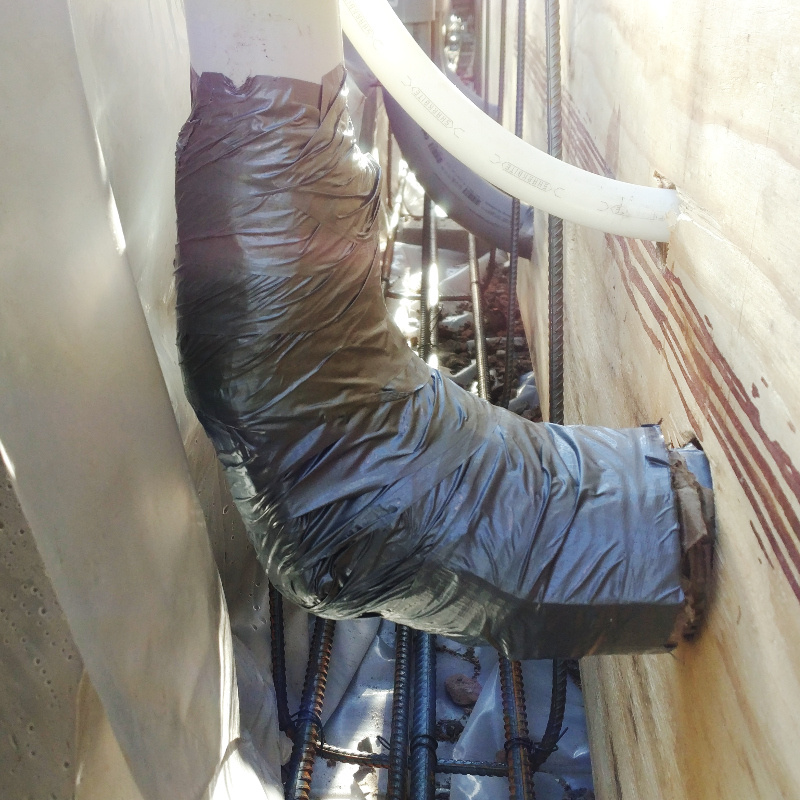
The city inspector came by in the morning and looked over everything. He didn't have that many things to say but he didn't give the permit until what he wanted was done. On my end he wanted something done with the drain pipe for my eventual sink. Here is what I had:
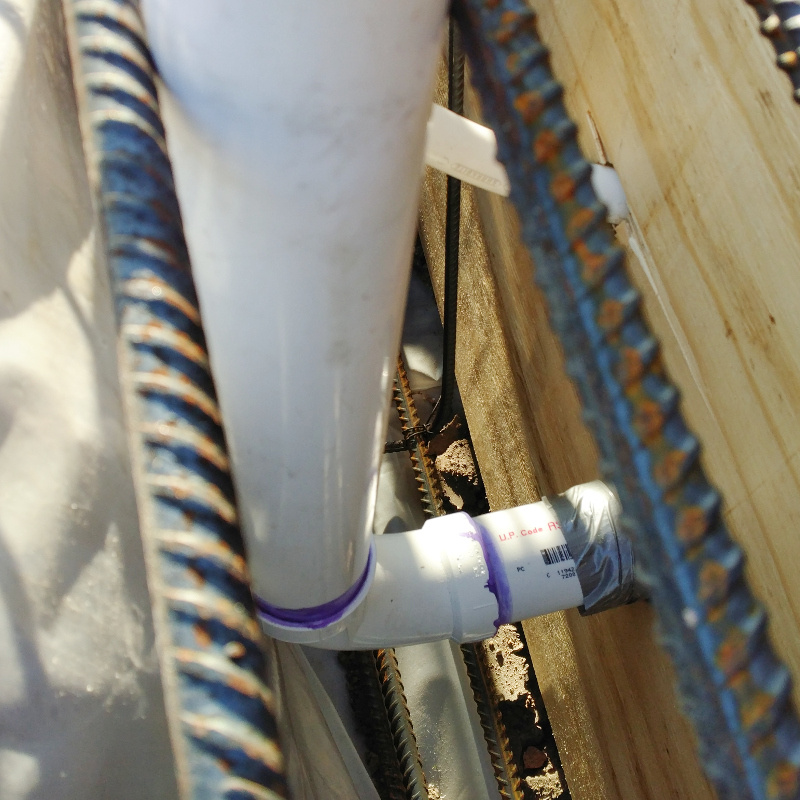
He wanted there to be something to create a void around the elbow and the part of the pipe that was horizontal. He said wrap some carboard around it and duct tape over. This made sense. The cardboard will rot away and leave a void around the pipe. This void will allow it to flex a little when the soil moves around the concrete.
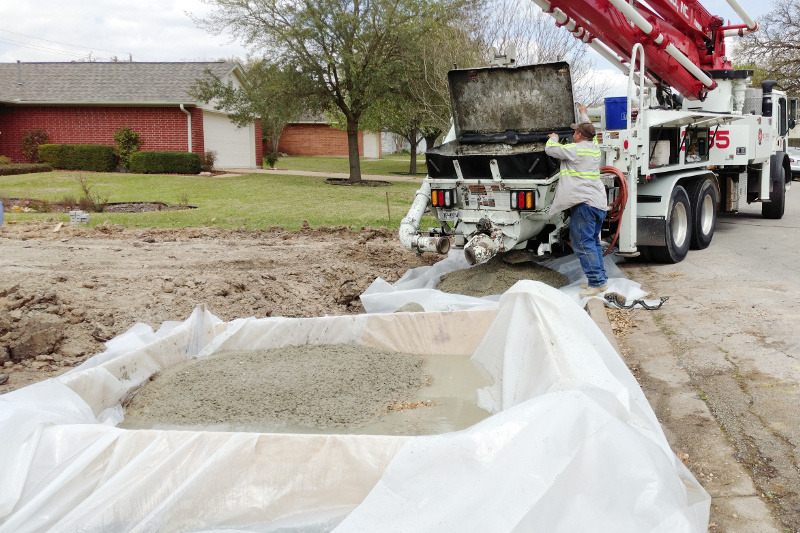
The other thing that is actually what held up the permit was a washdown basin. The inspector wanted a wash down basin to be built before he would sign off on the permit. The concrete guys had the material for one but had intended to wait until the pump truck showed up to make sure they didn't put it in a bad location.
So they picked a spot next to the road and built it. While the inspector went to another job. When he came back we were given the OK to proceed.
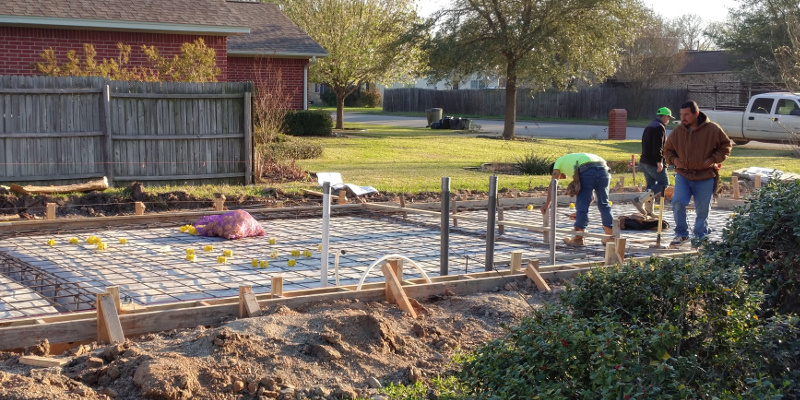
The only thing left for the concrete guys now until mud showed up was put in the chairs (yellow things). These are left in place and hold the slab reinforcement in the middle of the slab otherwise it always finds a way to fall down to the bottom where it does no good.
The pump truck that had originally been scheduled for 9am never showed. Apparently it was never dispatched for some reason and probably went to another job. So they sent out a a little larger one that just finished a small job.
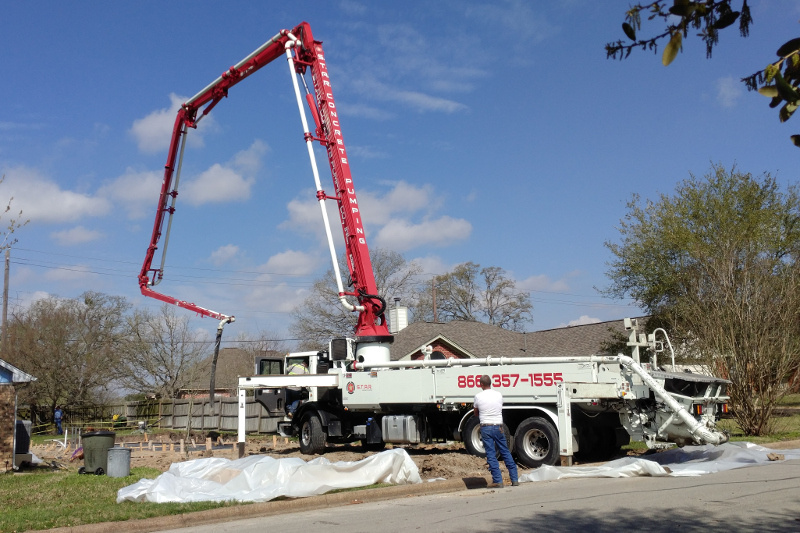
As soon as the pump truck arrived the concrete was ordered. Everyone sat around while the pump truck set up and and the concrete was dispatched. Then it showed up. The pump truck was set up next to the road so that trucks could take turns backing up to the pump with one on each side.
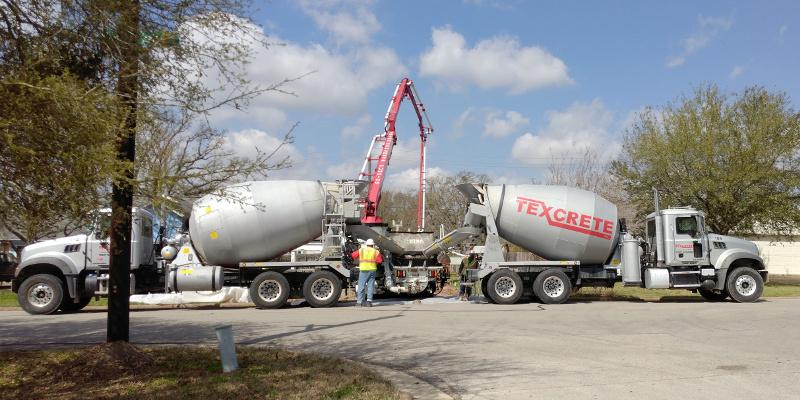
Now concrete starts flowing! Even though I know it is a lot of work I kind of missed not being in there working the concrete. I have some great memories of working on concrete projects with my grandpa, a civil engineer who absolutely loved the stuff.

First step after getting the concrete in all the beams and generally distributed where it should go is to screed it. This shows all the areas that need a little more concrete and is the part that really determines if the resulting slab will be flat.
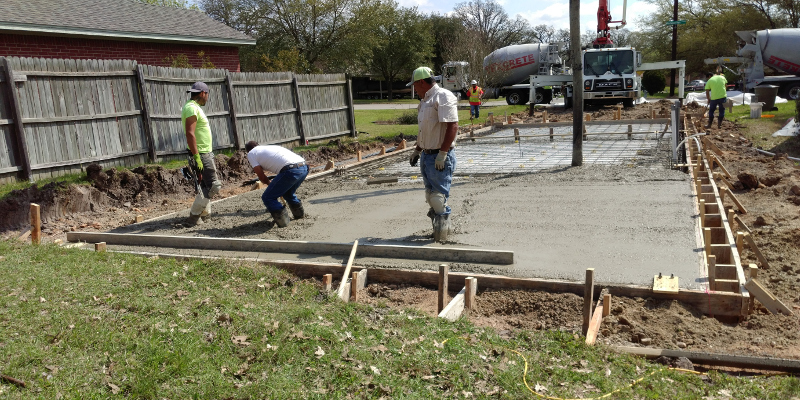
After screeding one of the men started smoothing things out with a bull float. Depending on the desired surface finish of the concrete this might be the last step aside from prettying up all the edges.
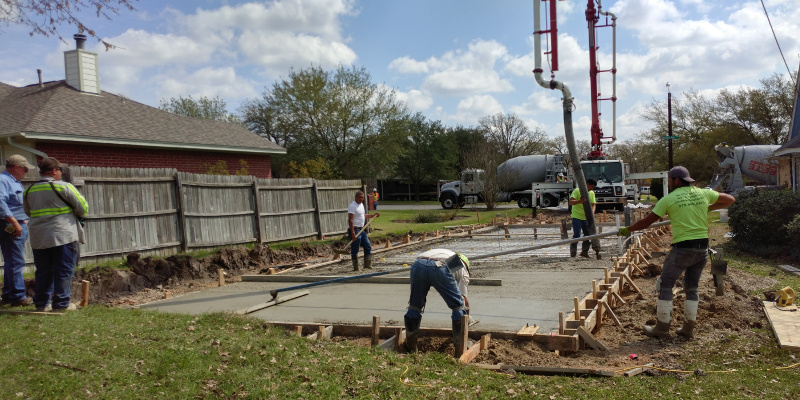
The concrete gets worked as the job goes with the initial finishing being completed on one end before the concrete on the other end is even poured. In this picture you can see two guys with a yellow tool on the middle of the far side. This is a vibrator that you can plunge into the concrete. This agitates it and helps things flow better so that air bubbles can come up to the surface.
And here is the reason for that washdown basin (although the pump truck isn't using it). Have you ever noticed bits of concrete that look like they were splashed on the road? Well, that is what happens when the drivers don't give a good enough washdown to their trucks before leaving the worksite. Obviously the city doesn't want that and they don't want it to just be dumped on the side of the road either so you build a catch basin to catch all the effluent when washing off the spout.
So the form running across the middle of the slab was to make the 1-1/2" drop from the enclosed section of the garage down to the carport so that water wouldn't come inside the building. I asked for a nice gently ramp section to be put in so that I can roll things in and out easily but any water that splashes on the garage dooor will still drain away from the interior.

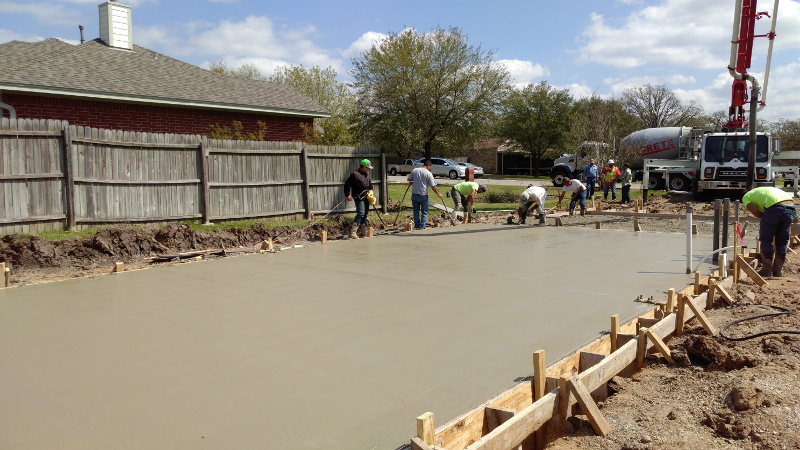
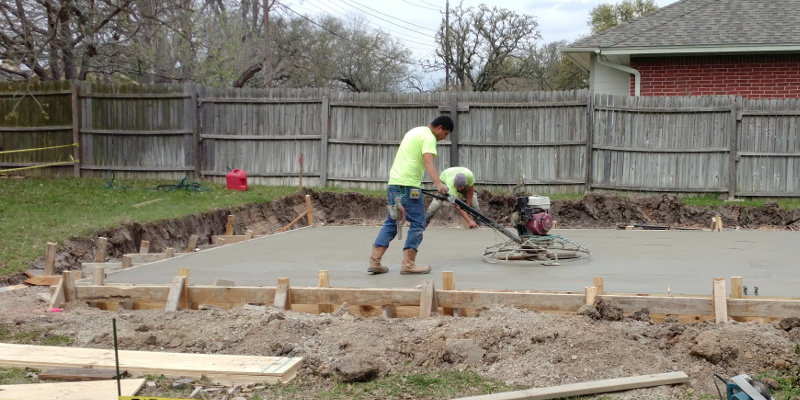
For an hour or two after the last concrete truck leaves the concrete workers are finishing the slab, tidying up corners, floating around my stub outs, removing the bolt patterns etc. Then they start power trowling the slab. They use it a few times as the slab starts to harden and probably 6 hours or so after the concrete is poured they give it a final trowling on the enclosed section of the slab to bring out that slick metal trowel finish.
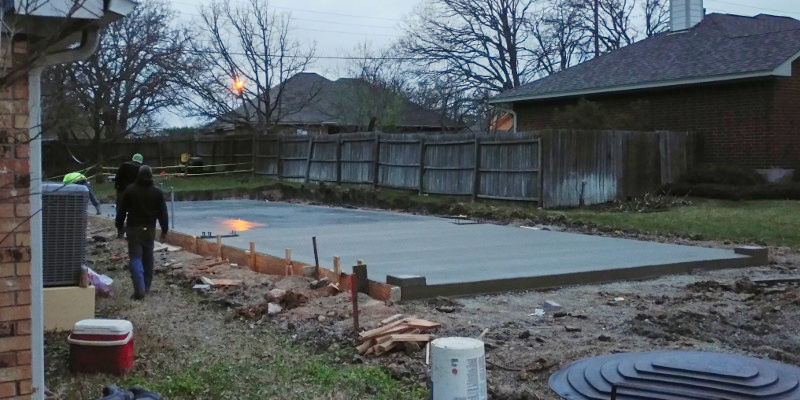
So the finishing is all complete now, you can see how shiny the enclosed portion next to the camera is. On the carport end I requested a very, very light broom finish. This has a little more grip to is so that when it gets wet it won't be quite as slick. The disadvantage is that sweeping is more difficult and small hard wheels don't roll over it as well. That is why I asked for a very, very light brooming (you make it light by waiting until the concrete is more cured).

The foreman wanted the forms torn down so he wasn't forced wait on the concrete guys for his next step so he convinced them to stay late and tear down the forms. The worked past 8:30 getting everything torn out (even though they came at 7am something).
That night I started watering the slab. This helps the concrete cure stronger, possibly up to 50% stronger than it would be if allowed to dry out.
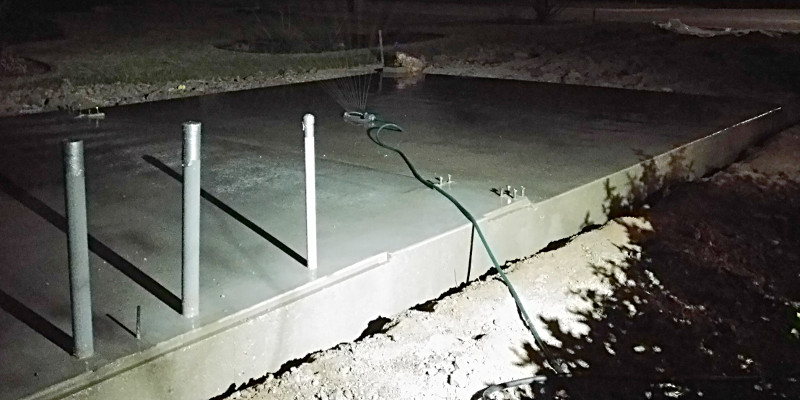
I'll keep the watering up for 7 days if I can though it is a little more difficult than you might think. I left the sprinklers running solid all night and woke up to a pretty good amount of water in the yard. To try and avoid that I went out and bought a single line water sprinkler timer but unfortunately it can only go as low as 1hr timed intervals. Really I need something that is 15 minute intervals with a 2 minute on time to keep the slab wet. So the day after the pour I just set a timer and went out there to give it more water every 15 minutes throuought the day. That night I put it on 1hr intervals with a 20 minute watering time.
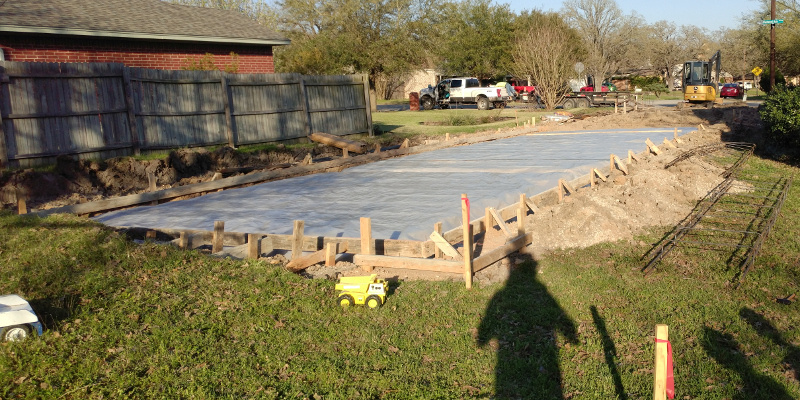
Here is the finished slab in the daytime:
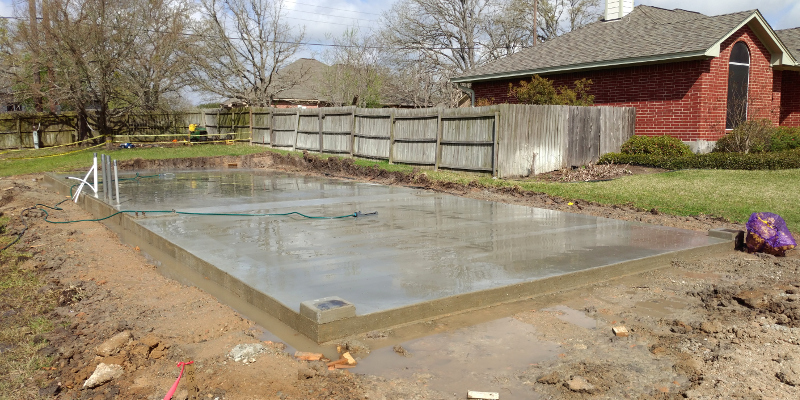
Overall I was pretty happy with the concrete people and I will probably call them up if I ever end up doing a project of my own without a general contractor. There is one thing I wish was better though which I thought about while the pour was going on but didn't speak up about. I should have insisted they used the vibrator more around the edges of the forms. There wasn't enough and as the air pockets around the edges didn't get shaken out. As a result there is some more porosity than I would like in some areas.
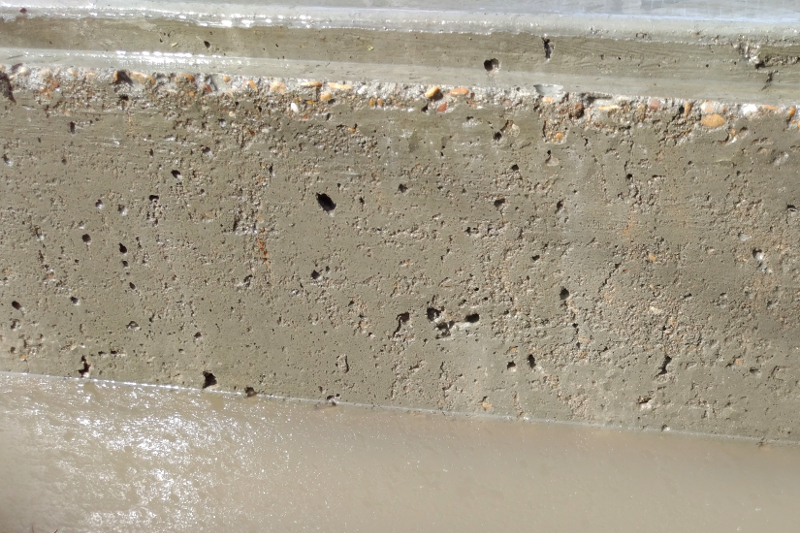
Next time right? If I ever get really annoyed by it I might pack some mortar into the gaps. I know I won't ever get around to it though and no one else will ever even notice.