


The Chimney
March 5, 2016
The most pressing project priority for me is putting a roof over the back porch so I can have a little space to work on things whenever it is raining. Before I do that though I have to take care of the chimney.
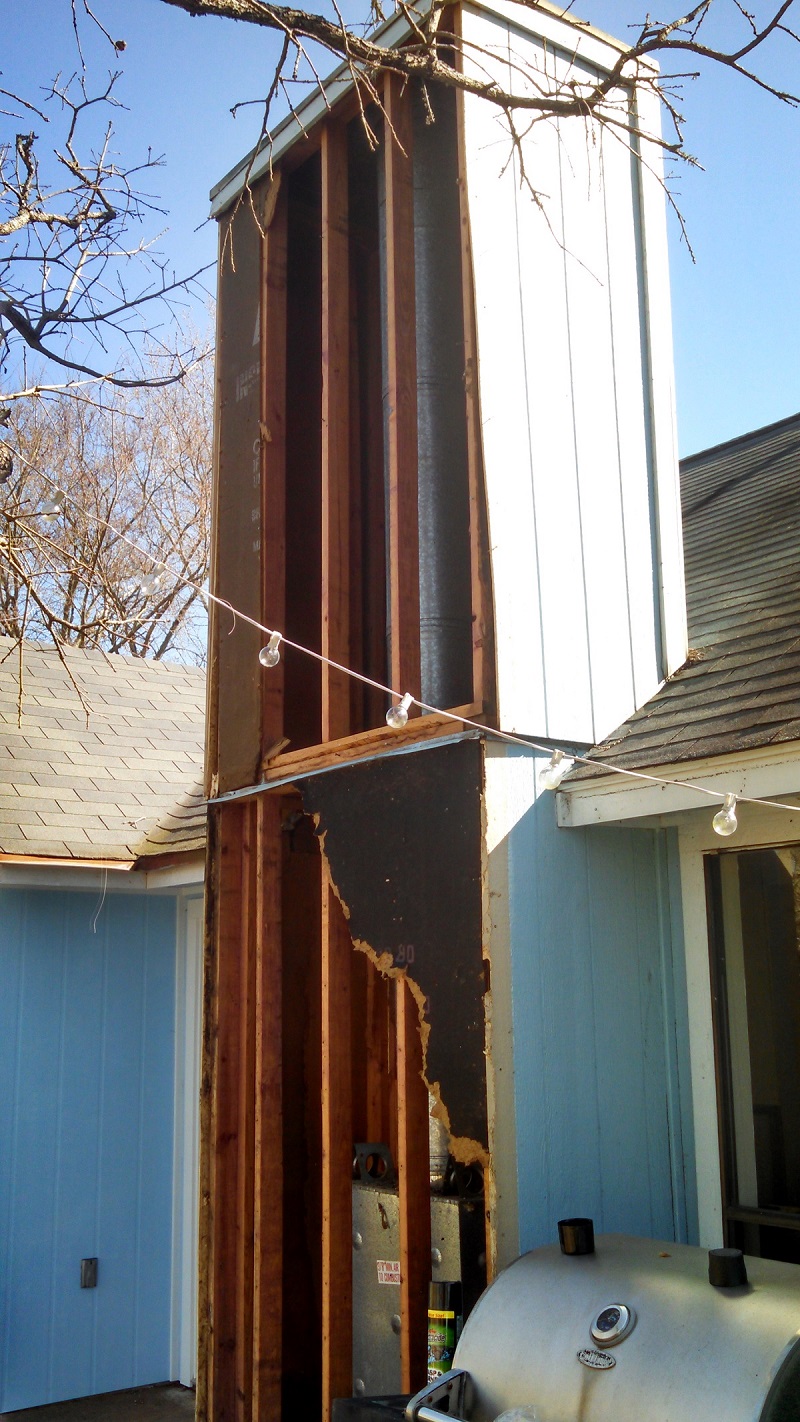
The previous owner replaced the siding at some point with more particle board and installed it sitting flat on the back porch slab, no gap at all. As you might guess the siding was falling apart a little bit and I was a little apprehensive of what I would find behind the siding.
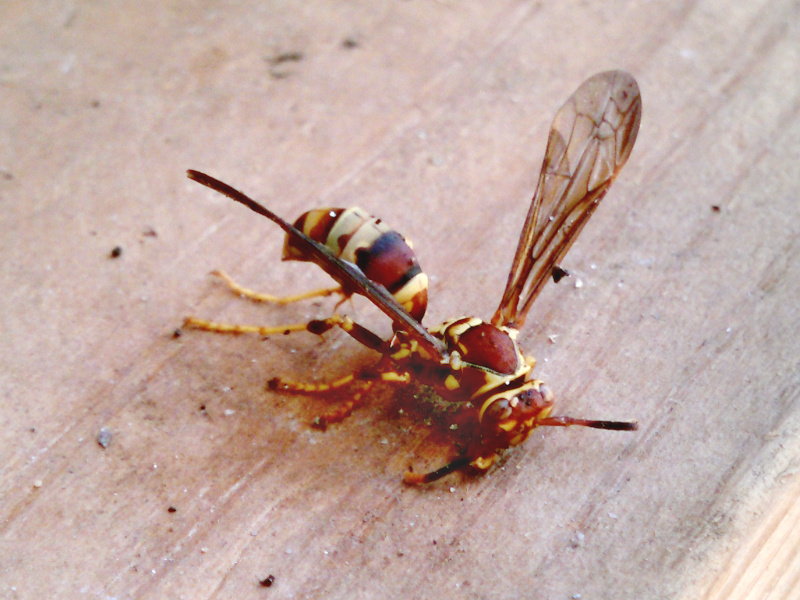
Because real life likes to spice things up there were wasps living inside the chimney. We had seen them flying around and crawling into cracks of chimney trim for awhile but fortunately hadn't been stung yet.
It was slow going with the wasp hazard but I ripped off the siding and sheathing. As it progressed I encountered more and more wasps. I managed not to get stung or fall of the roof though and found something interesting. There was no wasp nest anywhere! They were just hiding in every crack and between each board.
These wasps look very similar to the yellow jackets we have around here but the fact that we weren't stung before by them and none of them got me during the tear down shows that they aren't nearly as agressive. On close inspection they do look a little different, instead of black and yellow they are dark brown/yellow with some of them being almost all brown. I forgot to snap a picture of one before I killed them all and swept them into the garbage.
Back to the chimney. I expected a some structural rot but I didn't anticipate what I found. Everything was rotten all right but it wasn't just because the siding was sitting on the ground and the trim boards had issues, the sill plate was sitting directly on the back porch! There was no raised area for the chimney framing, it all just sat on the porch so anytime it rained everything got soaked. Everything on the bottom was so rotten and there were so many dead bugs as well that the resulting"dirt" I swept away had an earthworm in it! I don't know what the code/inspection situation was back in 1981 but how it let something so boneheadedly obvious through shows exactly how much you should just trust the system to deliver a good product.
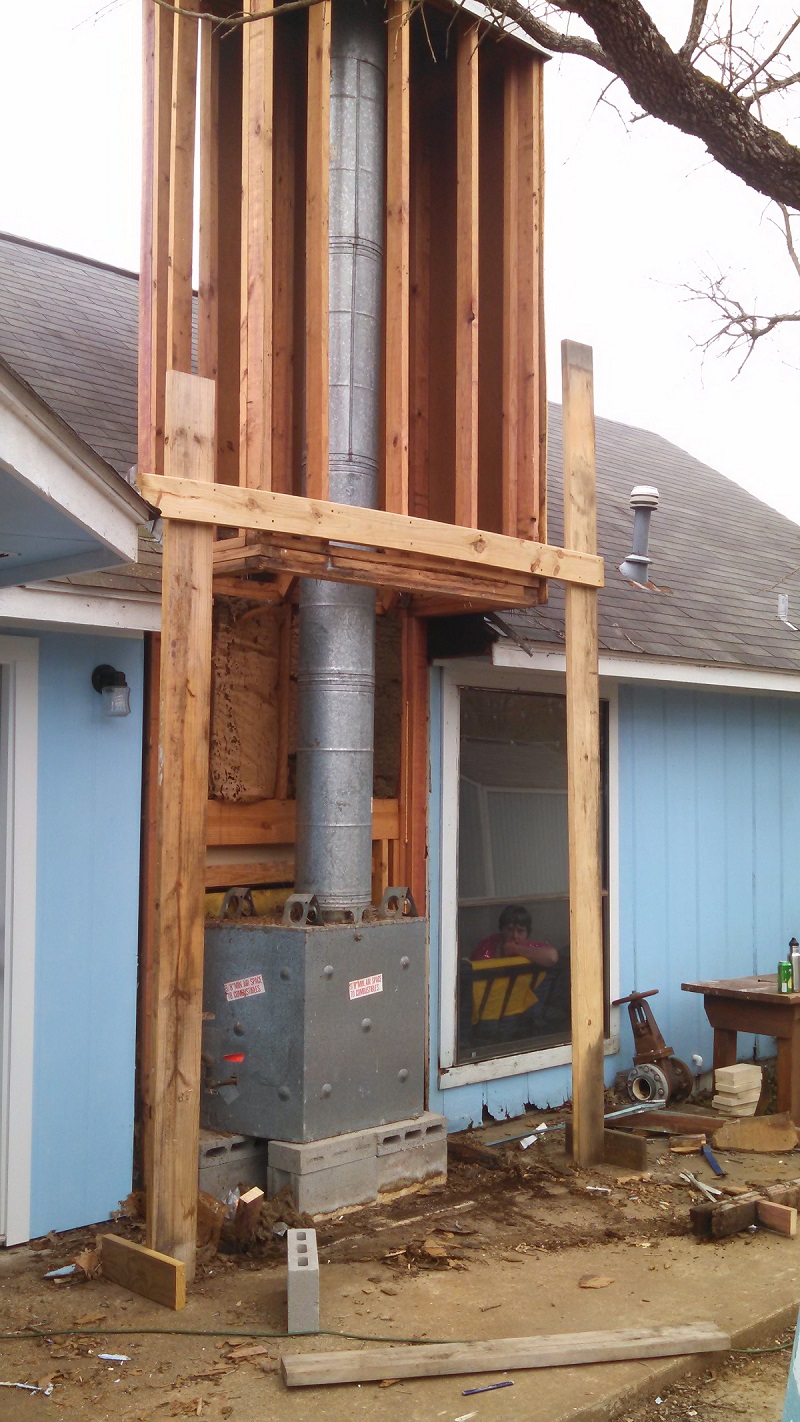
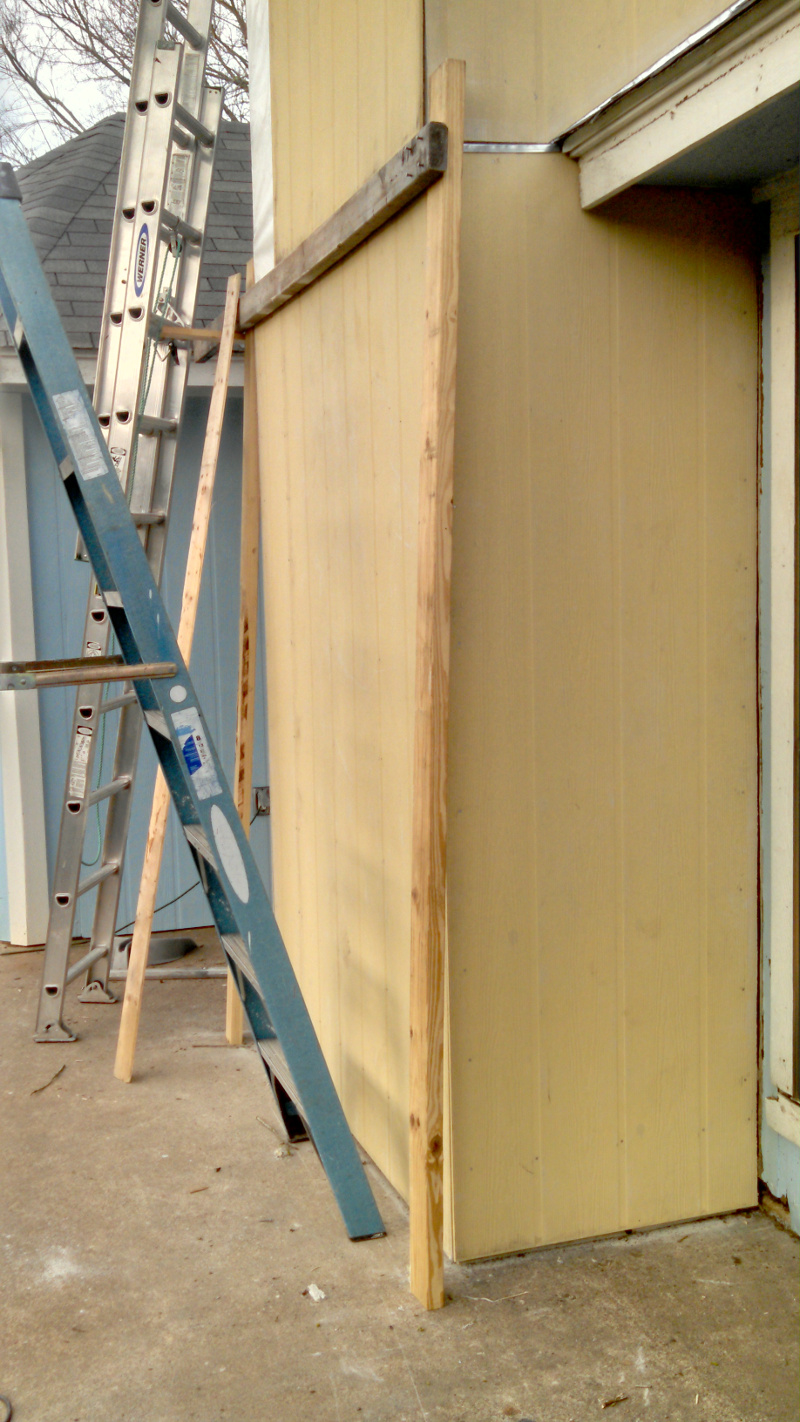
So the rotten sill and studs had to be ripped out and replaced. To support the structure while I did that I braced it with some 2x boards I had lying around
Now it would be absurd to just replace the rotted lumber and let everything rot out again so what is the solution? Well, what should have been done from the start is extend the house grade out to support the chimney but if I try to do that now then I will have to move the fireplace. Moving the fireplace is a big deal because there are a number of new code compliance issues that would force me to replace it and do an immense amount of work. So to get the chimney framing off the ground I opted to make a small stem wall supporting the outside walls of the chimney.
The wall is standard 4x8x16 masonry blocks set in mortar and filled with concrete. The blocks are tied to the slab by tie-down bolts inserted into the existing slab and bent over to give the fill concrete a good bite. Then there are j-bolts to hold the new sill plate down to the stem wall.
In case the chimney ever did fail and let water in I wanted to make sure it did not flood the house so the gap between each block is left open to drain water and allow air in like is seen on a brick wall. An open cell foam will keep the pests out.
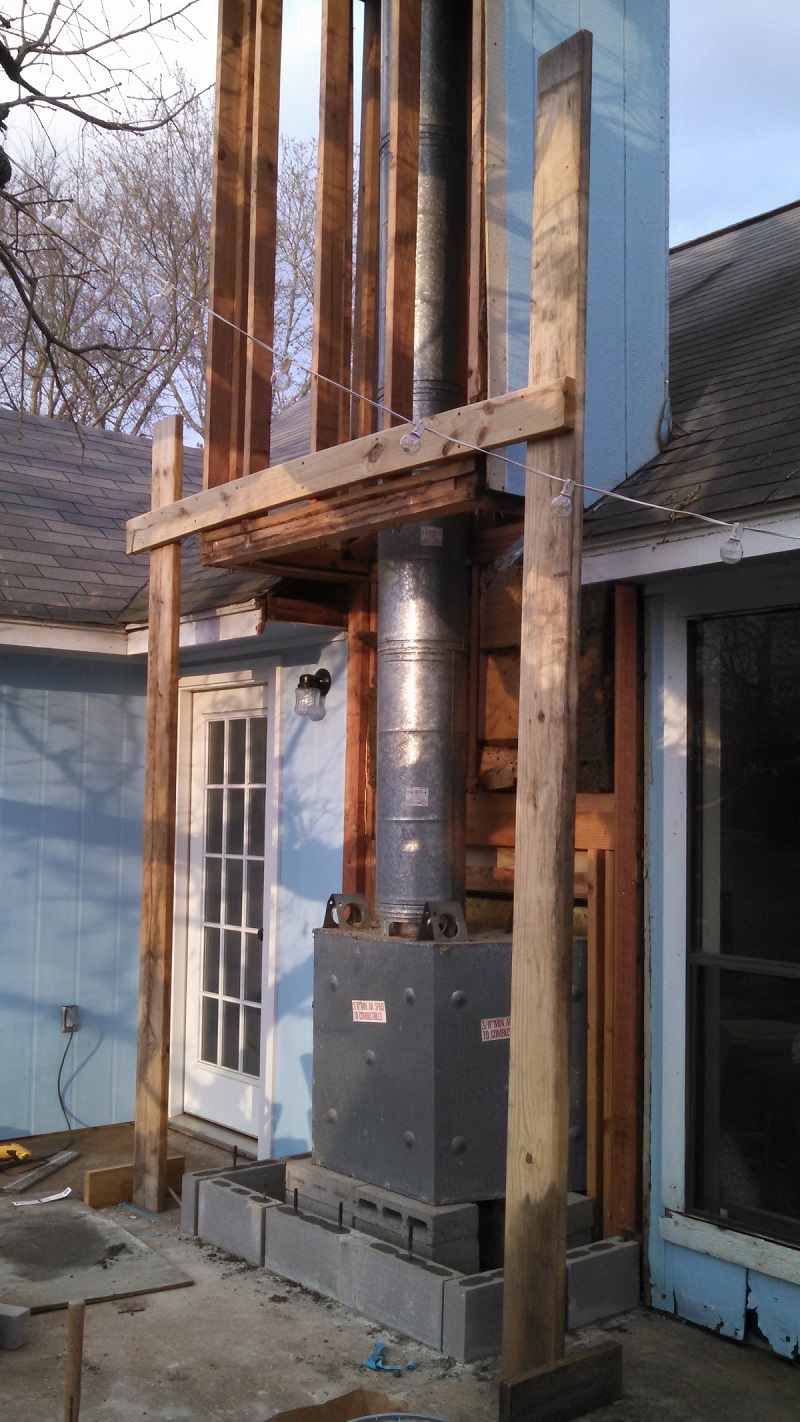
Ok, stem wall installed and a new sill plate bolted to the stem wall. Lets get down to business and frame this out again. Nope, not so fast - I have to go to Brownsville this weekend for a quick job in Port Isabel. Alright, it is sunny this weekend but what does the weather look like next week? 100% rain, thunderstorms all week. So I needed to button things up to keep the rain out and hopefully I can work on things next weekend.
That kept most of the rain out but it wasn't perfect. I did have to leave work early one afternoon when it was raining particularly hard because there was water dripping down the front of the fireplace inside. The sheathing on the top, back side of the chimney was getting hit with rain then dripping that down between the chimney-roof flashing and down behind the plastic. It got the drywall wet and gave us a scare but no real damage done fortunately.
So the weekend rolls around and it rains Saturday morning but I was able to get out and get some wiring put in that afternoon. I have wanted to put in an outlet for the TV right above the fireplace for awhile but purposely waited until I ripped up the chimney because I knew it would give me access to the backside of the wall and make running wires easier. Let me tell you, it was much easier. I tapped into the living room outlet circuit for power and also ran HDMI and ethernet from my new electronics closet.
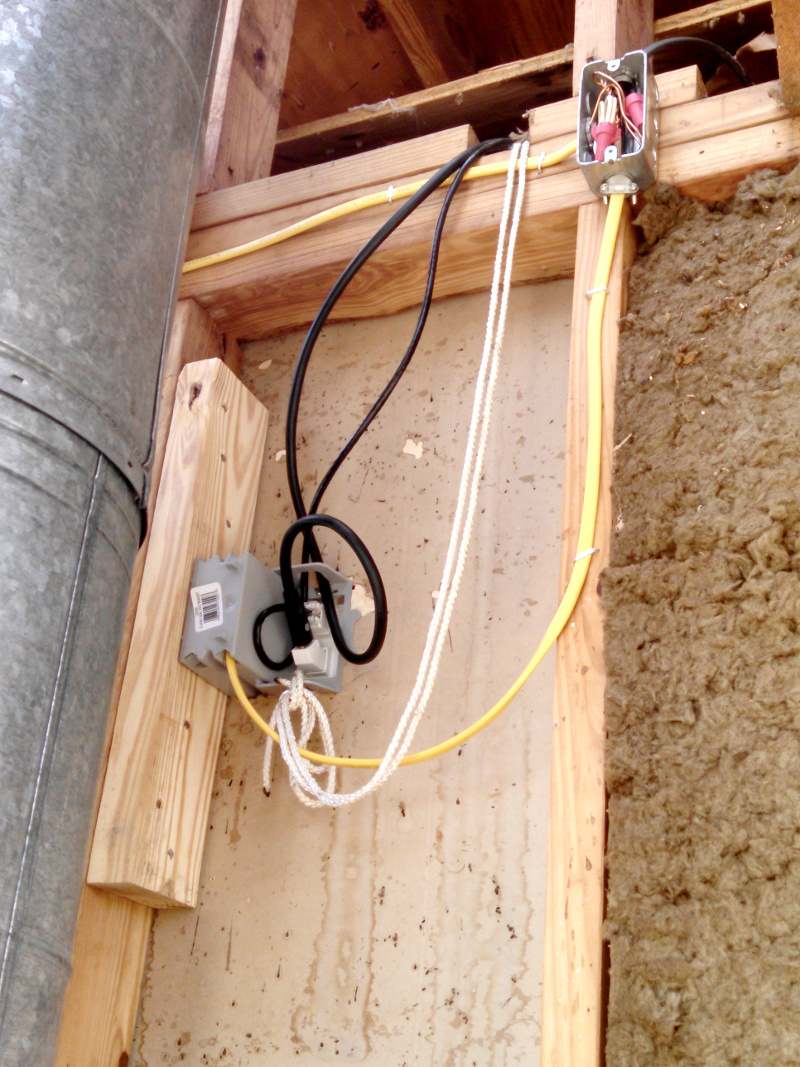
Before getting on with the structure you can see some of the water damage to the backside of the drywall where I put in the outlet. The drywall was definitely damp when I cut into it for the outlet but everything dried up fine and there wasn't any damage to the paint on the inside so I'm fortunate there wasn't any extra work created by the leak.
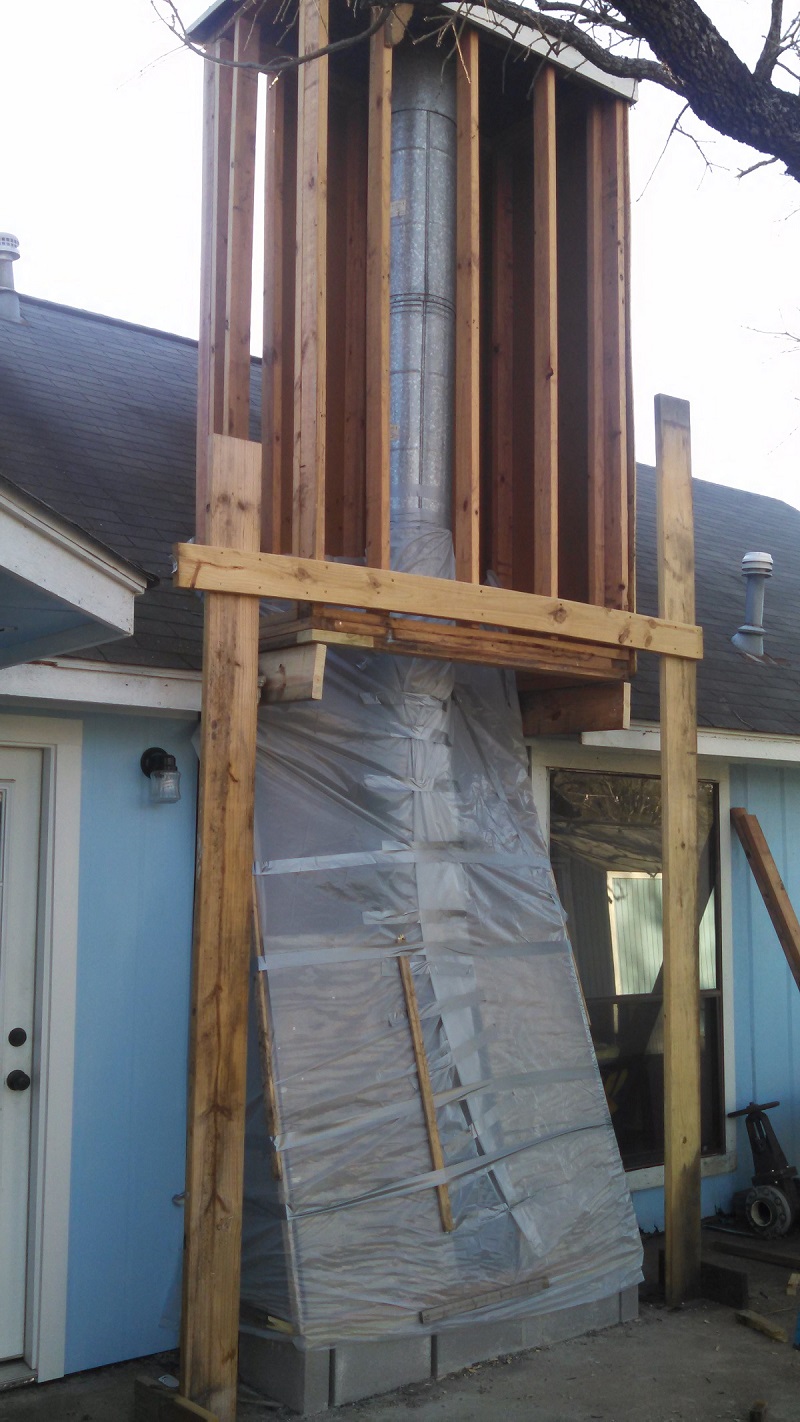
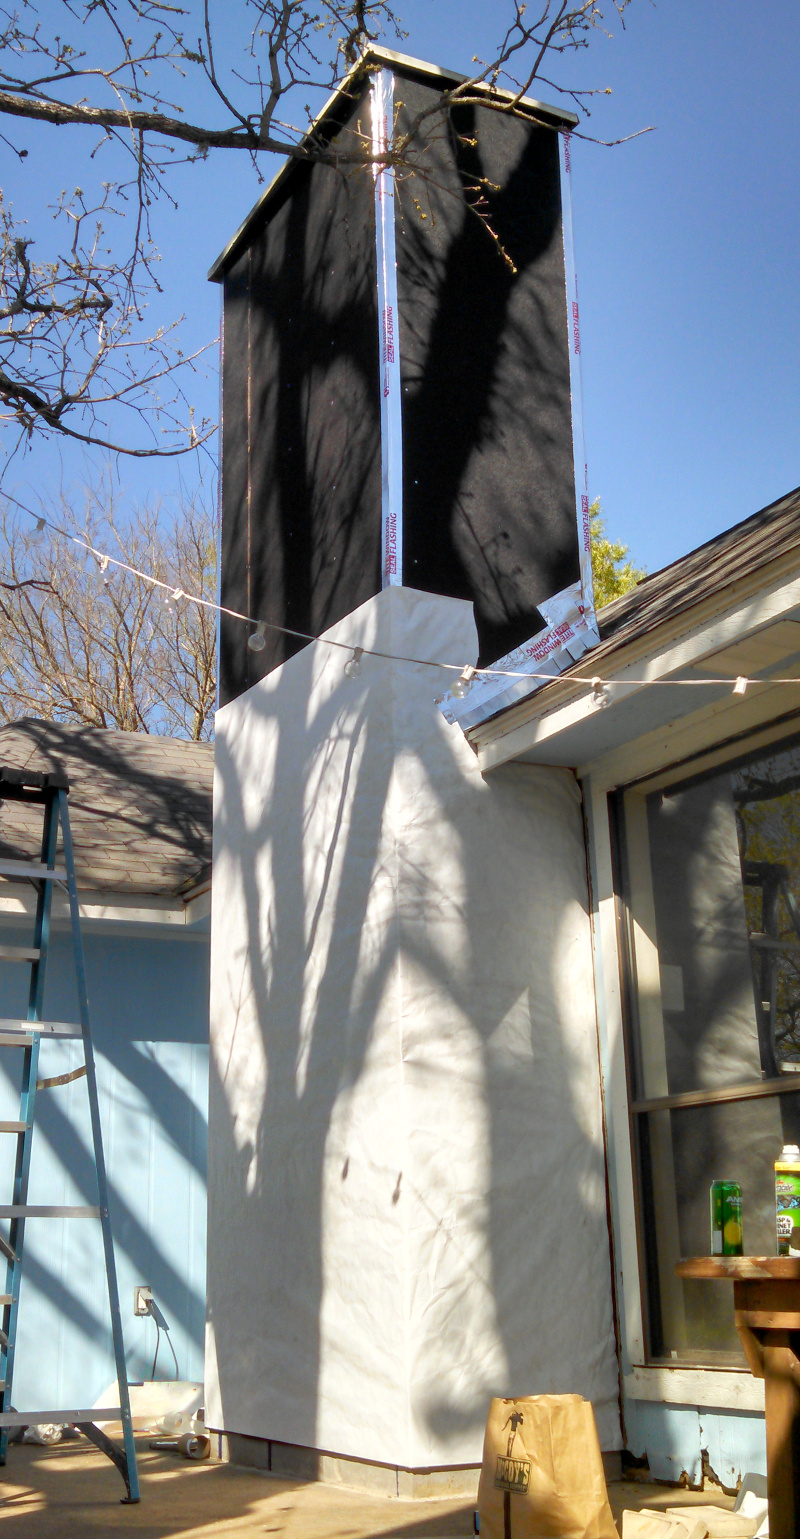
Back to the chimney itself. I got it framed out and you can see that there are two things in particular that are different than usual.

First there is diagonal bracing. There wasn't any before but the whole structure was very flimsy and even though it had held up fine for 35 years I didn't want to trust leaning my ladder up against it so I added some 1x4 braces. Some of them were 1x4 #2 pine like you would use if structurally required but I didn't have enough pine boards lying around and had to just use whitewood 1x4s for the rest. Since I was just adding them for my own safety during construction and not wind load bracing it didn't really matter and they worked to stiffen everything up so I wasn't worried about leaning a ladder up against it while putting up the exterior layers.
Second, in addition to the triple plate that is running half way up the chimney I added a 2x8 header supporting it. I didn't do it for support but rather because I wanted to change how the siding worked out. If you notice in the next picture with the sheathing standard 8ft panels put the joint above the bottom edge of the roof and get it right into a bad zone where the intersection hits the roof slope. This needed to change for 2 reasons. First, having that intersection happen at the roof line is just a bad idea if you can avoid it. It was obvious when I ripped things apart that things had leaked at that intersection in the past and had let water run down behind the siding. Second, I want to add a roof over the back porch next and putting that seam up high above the drip edge of the roof vastly complicates matters and I'm not sure how I would do it. So throwing in a header was easier (and definitely stronger) than putting in another plate and tiny cripple studs.
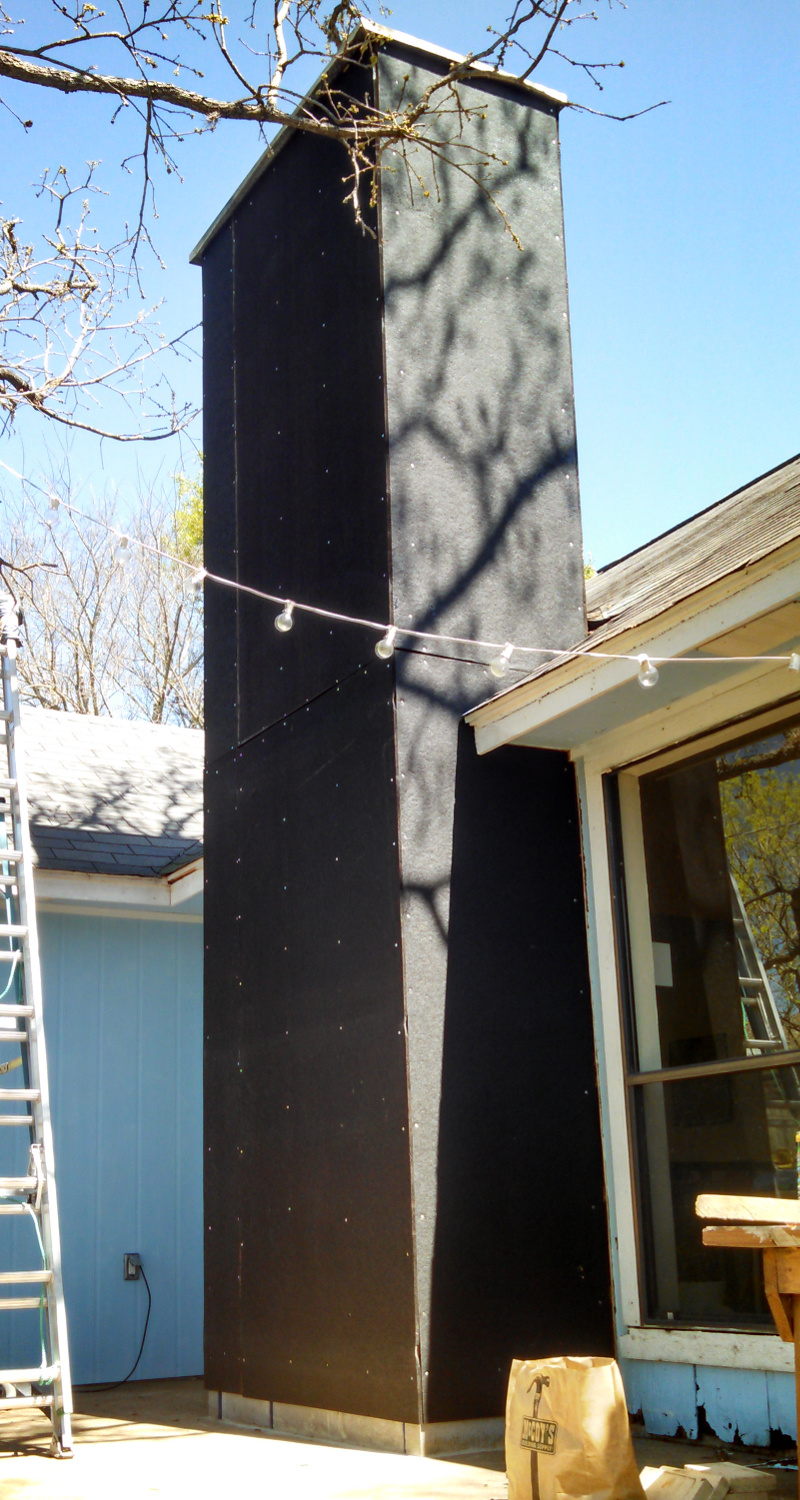
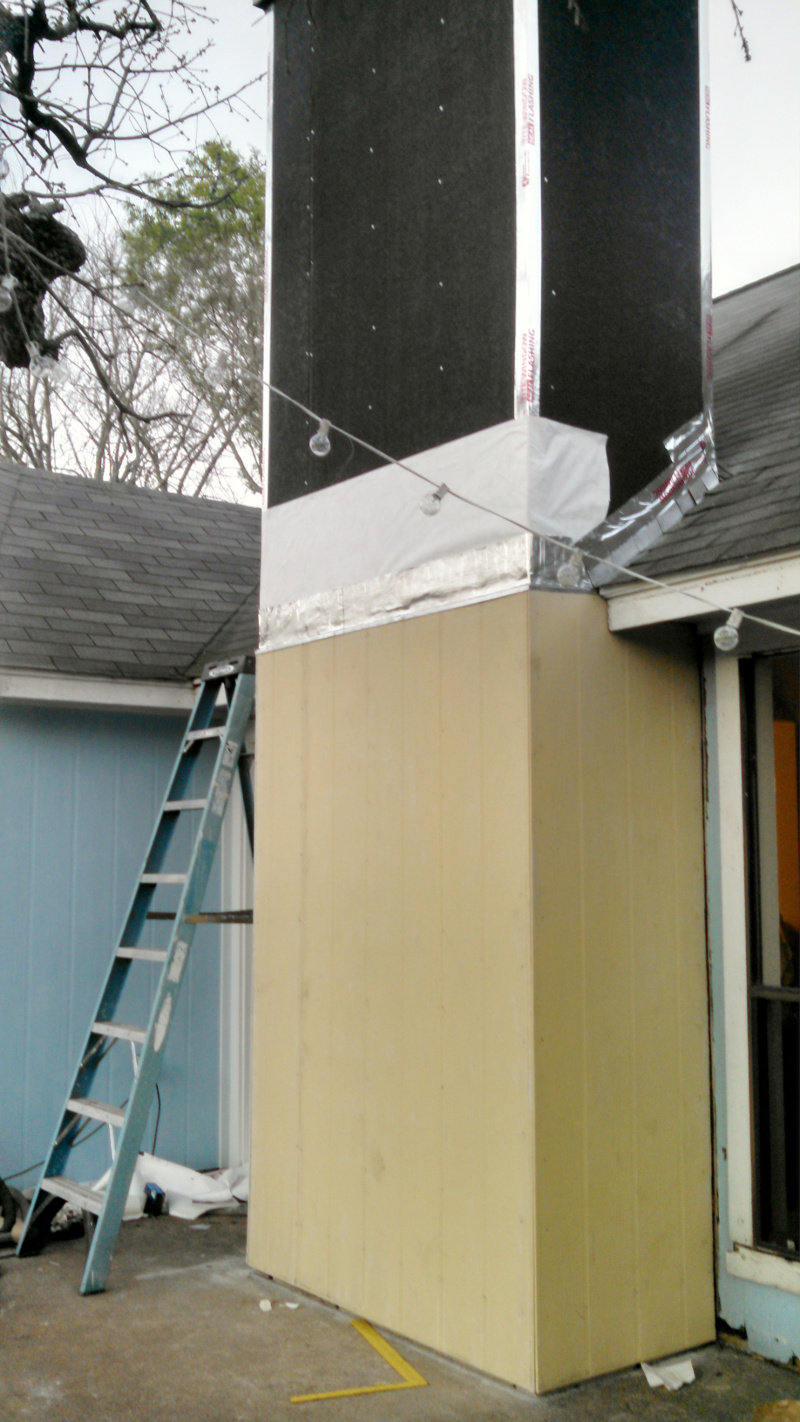
I decided to replace the existing tar fiberboard sheathing with more of the same. If I was building new I wouldn't but it is easier to just replace what panels need it as I go instead of ripping everything off the house and replacing with OSB of a different thickness.
Now remember those wasps that the chimney was full of when I tore it down? Well I definitely didn't get them all during the teardown and I have frequently had one flying around looking for their old home. One of the little buggers finally got me before I could get him. Here is the next one which I got to first, it is one of the ones that has more brown and looks less like a yellow jacket. I still wonder what they are.
Back to construction: after the sheathing I started replacing all the flashing at the roof/chimney intersection that I had ripped out. The previous owner had made some big mistakes with caulk on the old stuff that caused water to pool and collect at the corners instead of running away. I almost decided to tear into the roof and rip out the water damaged plywood but the areas were small enough that I decided to just slide extra backing shim stock underneath the shingles and then put in the flashing as normal.
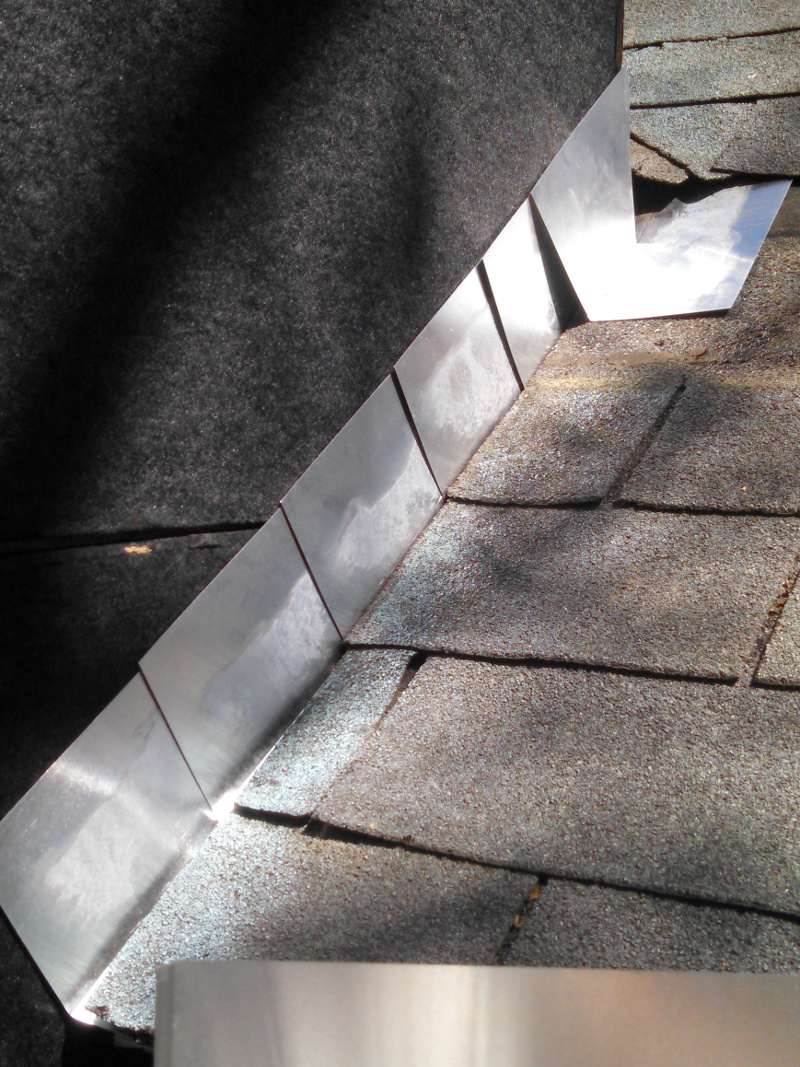
Even though I am guessing it was ok at the time the house as it was built is overall lacking in proper waterproofing underneath the exterior layer and I am correcting this mistake as I go around the house. Corners are most likely to get water damage so I added rubber/aluminum flashing to all the corners and then applied tyvek home wrap on top. The bottom is now ready for hanging the siding.
I installed the lower siding panels with a top that is below the drip edge of the roof instead of 8ft off the ground like original. Fortunately they make 9ft long hardie panels (though they are difficult to find and only McCoys sold them in town) and those will be long enough to put up top.
Now the siding is installed, you can see that I put in Z flashing on the top edge (remember to space it up off the siding so it drips off properly) and then applied more aluminum/rubber flashing over it to cover the nail holes and make sure that nothing comes in the joint.
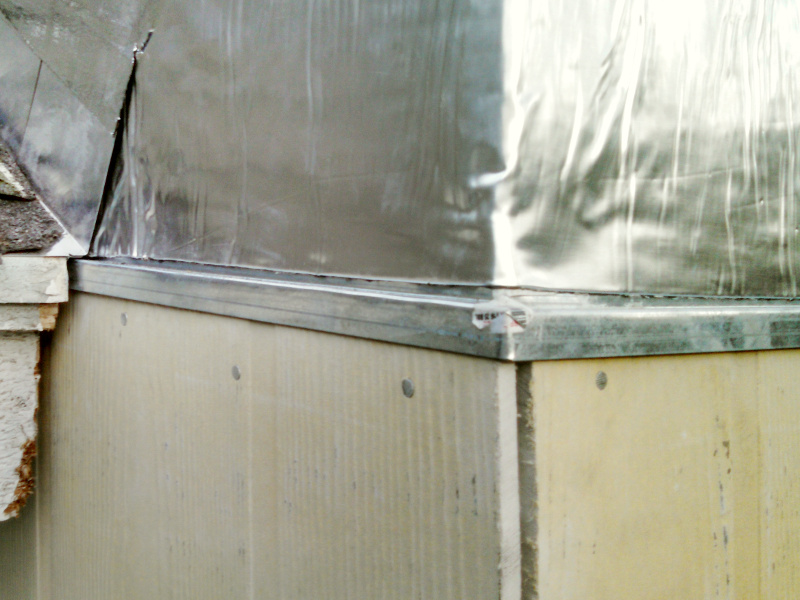
One detail on the flashing that I did a little different than usual was to make the flashing on the sides purposely sloped instead of level so that water would run away from the house and off the end of the flashing. I put in about a 1:12 drop.
After the flashing I started on the upper siding panels. These are the hardest part of the chimney for me because I only have the short a-frame ladder and the long extension ladder and handling heavy hardie panels on a ladder is probably the most dangerous thing I will do all year. In particular the worst board is the full size 4x9 sheet that goes on the outside wall. To help with that I slapped together a quick 2x4 support to rest the bottom of the panel on after I got it up into position. It worked (and would have been impossible without) but I don't recomend it. If I replace the siding on the rest of the house myself I will probably rent scaffolding and hire a helper for the weekend. I ended up having to drop a board on the ground while lifting to prevent myself from getting unbalanced and possibly falling.
So things are watertight now but I still have more siding to hang, trim boards to apply and of course painting.
To be continued..............
Update November 16, 2016
So I finished hanging the siding then got around to painting the chimney and progress pretty much stalled out. Since it was now watertight (although not good forever without the trim boards) the chimney priority plumetted. I purchased the trim boards and even painted them but since I knew there were going to be some trim changes involved with the eventual porch I got lazy and didn't ever put them up.
I say I got lazy but that isn't really true. Sometimes the day job takes me away (2 months this year), sometimes I just work on other things. The work never stops though, it just takes a different form. This time I got sidetracked pretty good and I started a few things before I got back to the chimney:
Solid aluminum pot strainersBronze box for urns (Columbarium)
My 2nd casting furnace
Fire ant mound castings
Family plaques
More family plaques
Wasp nest castings
Outdoor shelving with a roof
Kids learning towers for the kitchen
Large play structure for the kids
Six months isn't too long to put off finishing a project like the chimney is it? Ok, maybe it is. I'm only getting around to it now because the impending winter and recent daylight savings time change gave me a little kick in the ass.
I'm not just putting trim on the chimney though, I'm going ahead and putting a roof on the back porch like I was planning before I started on the chimney. Since the porch roof is a large enough project to get it's own page I'll just roll the chimney completion into that project:
A roof for the back porch